


Fix a Wobbly Toilet Seat in 5 Minutes for Free
Two plastic caps, two bolts, one screwdriver — and the wobble you've been tolerating for months is gone before your coffee gets cold
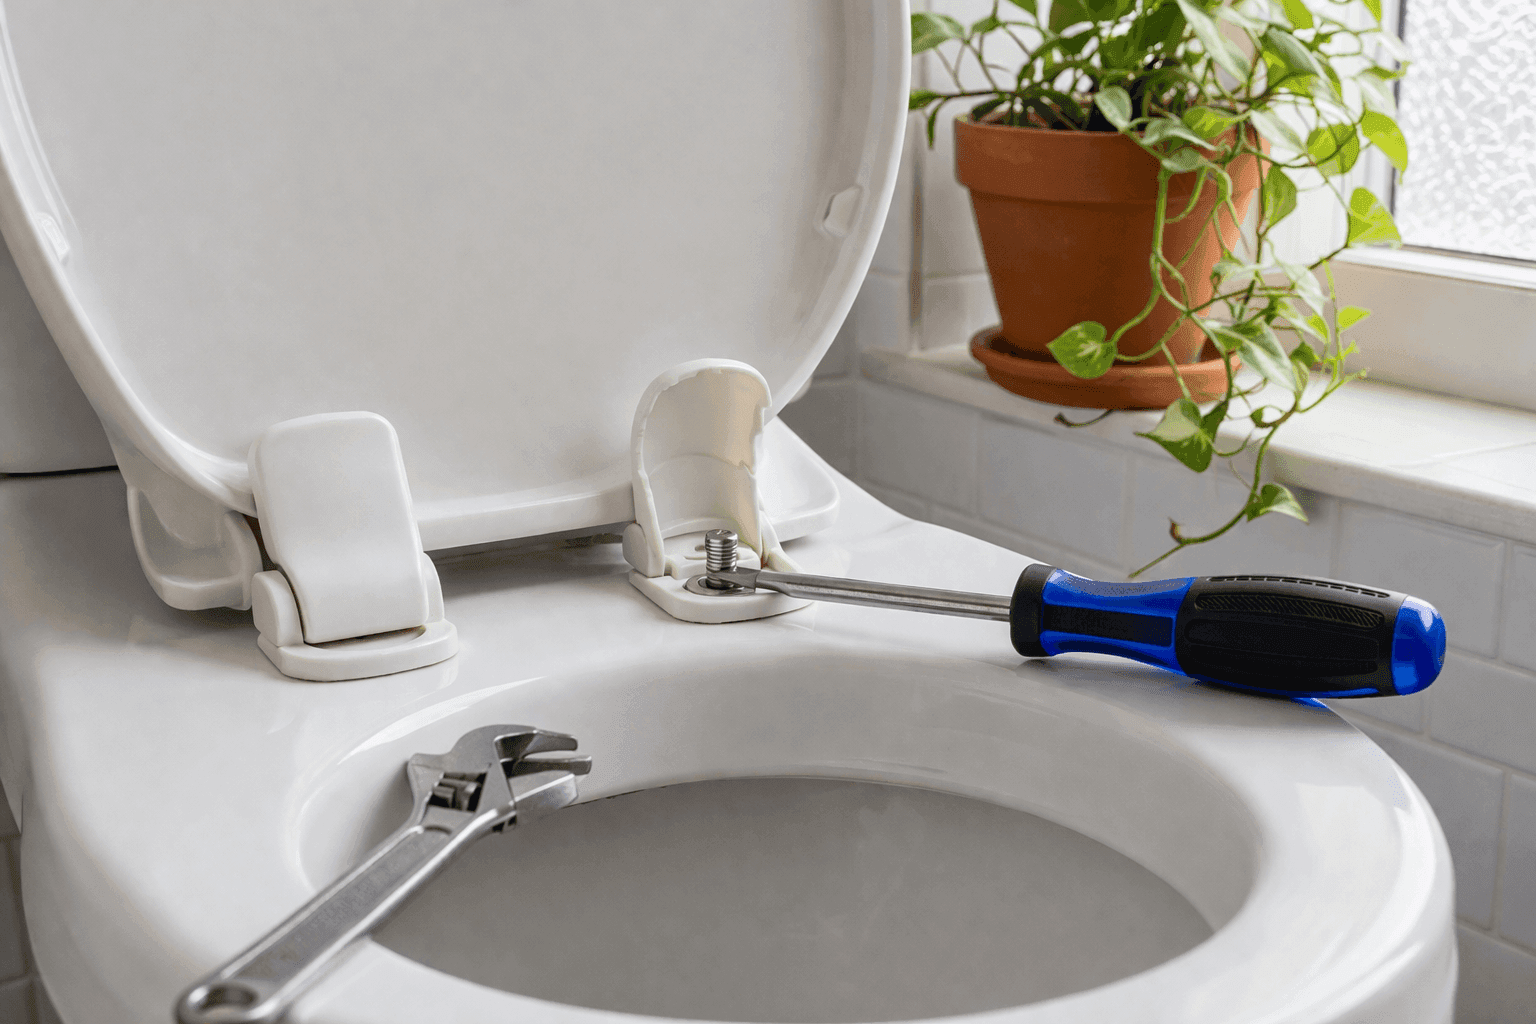
A wobbly toilet seat belongs in a specific category of household annoyance — the kind that is mildly infuriating every single day, that everyone in the house has silently accepted as just how things are, and that turns out to take approximately five minutes to fix once you know what you're actually looking at. There is no plumbing involved. There are no parts to buy. There is no specialized knowledge required. Two decorative plastic caps at the back of the seat hinge pry off to reveal a standard nut and bolt assembly that has simply worked loose over time from regular use — tighten both sides evenly with a screwdriver, snap the caps back into place, and the wobble that has been driving you quietly mad for months is completely gone. The whole job takes five minutes on a single toilet and about fifteen if you go through the whole house while you're at it, which you absolutely should, because the toilet seats you haven't been thinking about are almost certainly looser than you realize.
What You Need
- Flathead screwdriver — for prying off the plastic hinge caps and tightening the bolt beneath; a butter knife or even a coin works in a pinch for the cap removal
- Phillips screwdriver — some toilet seat bolts have a Phillips head rather than flathead; check before starting so you have the right driver in hand
- Adjustable wrench or pliers — optional, for holding the nut beneath the bowl rim steady while tightening the bolt from above if the nut spins freely rather than gripping on its own
- Flashlight or phone torch — for seeing clearly under the bowl rim where the retaining nuts sit on seats whose hardware extends below the porcelain
- That's genuinely it — no parts, no hardware store trip, no plumber, no prior knowledge required beyond what you're about to read
How to Fix It
- Locate the two plastic caps at the back of the toilet seat where the hinge attaches to the porcelain bowl — they sit one on each side of the seat, flush with or slightly raised above the hinge surface, and are usually white or matching the seat color. On virtually every residential toilet seat manufactured in the last thirty years, the entire tightening mechanism lives under these two caps.
- Pop both caps open by sliding the tip of a flathead screwdriver or butter knife into the small gap at the front edge of each cap and applying gentle upward pressure — they hinge or snap upward to reveal the bolt head beneath. Apply steady, controlled leverage rather than sudden force; the caps are designed to open easily and excessive force cracks the plastic hinge that holds them in place.
- Inspect what's underneath before tightening anything — most toilet seat bolts have a slotted or Phillips head accessible from above, with a plastic or metal nut underneath the bowl rim that holds everything to the porcelain. Confirm whether your nut spins freely when you turn the bolt or grips on its own, because a freely spinning nut requires one hand above and one below the bowl to tighten effectively.
- Tighten the bolt on one side by turning it clockwise with your screwdriver while holding the nut steady beneath the bowl rim with your fingers or a pair of pliers if it spins — turn until the seat feels firmly anchored at that hinge point with no lateral movement. Work on one side completely before moving to the other rather than alternating back and forth, which makes it difficult to feel when each individual side is genuinely tight.
- Tighten the second bolt on the opposite side using the same technique, applying the same degree of firmness so both hinges carry equal tension. An unevenly tightened seat — one side tight and one side only snugged — will develop a new wobble within weeks as the loose side continues to work free under the load that the tight side is no longer sharing equally.
- Test the seat by gripping both sides and attempting to reproduce the wobble before snapping the caps back into place — a seat that still moves after both bolts are tightened has either a bolt that has stripped its threads in the plastic mounting hardware or a cracked mounting point in the seat hinge itself, both of which indicate the seat needs replacement rather than tightening. Confirming the fix is complete before replacing the caps saves the frustration of reopening them to retighten.
- Snap both caps firmly closed by pressing down on each one until you hear or feel the click that confirms the hinge is fully engaged — a cap that is only partially closed will work open again during regular use and eventually break off at the hinge point. Give each cap a firm press at both the front and back edge to confirm it's fully seated on both sides before considering the job done.
- Repeat the entire five-minute process on every other toilet in the house while the screwdriver is still in your hand — toilet seat bolts loosen gradually and uniformly across all seats in a home, and the ones that don't feel wobbly yet are almost certainly working their way there. A quick check and snug on every seat takes fifteen minutes total and means you won't be back under another cap doing this again for a year or more.
Professional home inspectors who assess bathroom fixtures always check toilet seat stability as a standard part of their inspection protocol — and they note that seats which have been repeatedly retightened over many years eventually reach a point where the plastic mounting post that the bolt threads into has deformed enough that it no longer holds a firm tighten regardless of how much torque is applied. The indicator is a bolt that tightens to a stop but allows the seat to wobble immediately when pressure is applied, rather than a bolt that simply needed more turns. At that stage, a full seat replacement is the correct fix rather than continued retightening — and a basic replacement toilet seat costs $15 to $25 at any hardware store and installs in under ten minutes using the same bolt access points you just learned about.


