


Floor Revival: Fix Scratches Without Expensive Refinishing
Restore hardwood beauty in minutes using household solutions
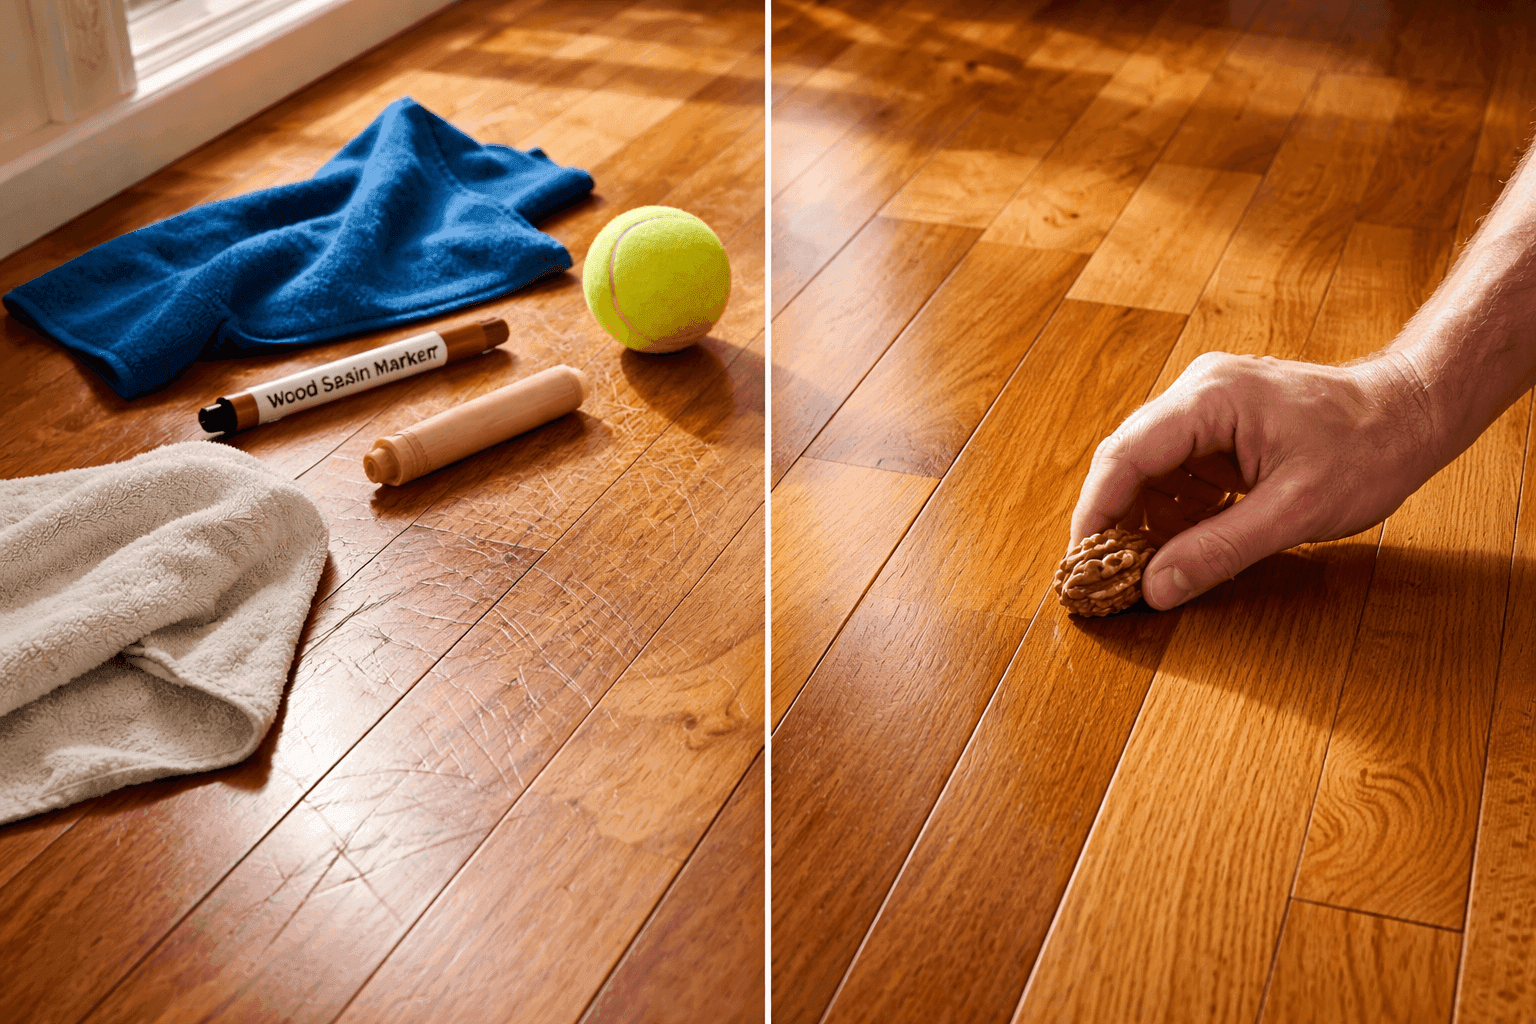
Hardwood floors develop scratches, scuffs, and minor damage through normal daily life—furniture moves, shoes track debris, pets' nails click across surfaces, and dropped items leave their marks—creating imperfections that catch light and draw eyes away from the floors' natural beauty. Professional refinishing costs $3-8 per square foot with minimum charges of $1,000-2,000 for whole-room work, pricing many homeowners out of repairs for damage that's actually quite minor and fixable with simple household solutions costing just dollars. Light surface scratches respond beautifully to the surprising walnut trick where rubbing shelled walnut meat directly into scratches allows natural oils to help wood swell and darken, essentially erasing shallow damage through organic chemistry rather than aggressive sanding. Deeper scratches benefit from wood stain markers or wax crayons applied carefully to fill and disguise damage, while scuffs from rubber-soled shoes or furniture pads often disappear completely with gentle buffing using tennis balls, pencil erasers, or melamine foam sponges that lift marks without damaging finish underneath. For concentrated damage in high-traffic areas, strategic application of paste wax or hardwood floor polish to entire sections blends repairs invisibly while refreshing finish that's dulled from years of foot traffic. These fixes take 15-30 minutes depending on damage severity and produce dramatic improvements that extend floor life by years while postponing expensive refinishing until it becomes truly necessary rather than prematurely addressing cosmetic issues you can handle yourself for essentially free.
What You'll Need
- For Light Scratches (free):
- Shelled walnuts for natural oil treatment
- Soft cloth for buffing
- Clean microfiber towel
- For Medium Scratches ($5-10):
- Wood stain markers in matching floor color
- Wood filler crayons or wax sticks
- Fine steel wool (0000 grade)
- Clean rags for wiping excess
- For Scuffs & Surface Marks (free):
- Tennis ball on a stick or by hand
- Clean pencil eraser
- Melamine foam sponge (Magic Eraser)
- Baking soda paste (alternative method)
- For Area Refreshing ($8-15):
- Paste wax for hardwood floors
- Floor polish or reviver product
- Clean applicator cloths
- Buffing towel for shine
- For Deep Gouges ($10-15):
- Color-matched wood filler
- Fine-grit sandpaper (220-grit)
- Matching stain and polyurethane
- Small artist brush for precise application
Fix Each Type
- Test your chosen repair method in an inconspicuous area first—behind furniture or in closets—ensuring the technique doesn't damage finish or create more visible problems than the original scratches you're attempting to fix.
- Clean damaged areas thoroughly with hardwood floor cleaner, removing all dirt, dust, and debris that would prevent repair materials from adhering properly or getting trapped under treatments creating permanent marks.
- Apply the walnut trick to light scratches by rubbing shelled walnut meat directly along scratch lines, allowing natural oils to penetrate wood for 5-10 minutes, then buffing with soft cloth to blend repairs invisibly.
- Fill deeper scratches with color-matched stain markers or wax crayons, applying product generously into the groove, then wiping away excess with clean cloth while leaving just enough to disguise damage without creating raised ridges.
- Buff scuff marks gently using tennis balls, pencil erasers, or melamine sponges with circular motions, applying light pressure that lifts marks without abrading the polyurethane finish protecting your floors underneath surface damage.
- Refresh high-traffic areas by applying thin coats of paste wax or floor polish to entire sections rather than spot-treating, which ensures repairs blend invisibly while reviving dulled finish throughout the zone.
- Fill actual gouges with color-matched wood filler, letting dry completely, then sanding smooth before applying matching stain and protective polyurethane coats that restore both appearance and protection to damaged spots.
- Maintain repairs by implementing protective measures: felt pads under furniture legs, area rugs in high-traffic zones, no-shoes-inside policies, and regular sweeping that prevents new scratches from undoing your careful restoration work.
Flooring professionals emphasize that prevention beats repair every time—installing quality door mats at every entrance, implementing no-shoes policies, adding felt pads to all furniture legs, and trimming pets' nails regularly prevents the majority of scratches that homeowners spend time and money repairing after damage occurs. For wood filler repairs, buy multiple shades and mix them on a disposable surface to match your specific floor color exactly rather than settling for close-enough results that remain visible forever—precise color matching is worth the extra five minutes. The walnut trick works specifically because walnut oil is similar to the natural oils in hardwood, but other nut oils (pecan, almond) can work similarly if walnuts aren't available—the key is using food-grade oils that won't turn rancid or smell unpleasant over time. For floors with multiple scratch directions, apply wax or polish in figure-eight patterns rather than straight lines, which better fills scratches running in various orientations while creating more uniform shine across repaired sections. The biggest mistake homeowners make is using too much product thinking more equals better—whether stain markers, wax, or filler, excess creates visible buildup that's harder to remove than the original scratches, so always start with minimal application and add more only if truly needed. Remember that hardwood floors are meant to develop character through years of use—not every tiny scratch requires immediate repair, and sometimes accepting that lived-in patina creates more authentic beauty than obsessively maintaining showroom perfection that feels sterile rather than welcoming in actual homes where life happens daily.


