Turn Wooden Crates into Rolling Under-Bed Storage for $12
Four casters, a rope handle, and a weekend afternoon — the under-bed storage that actually looks good when it rolls out
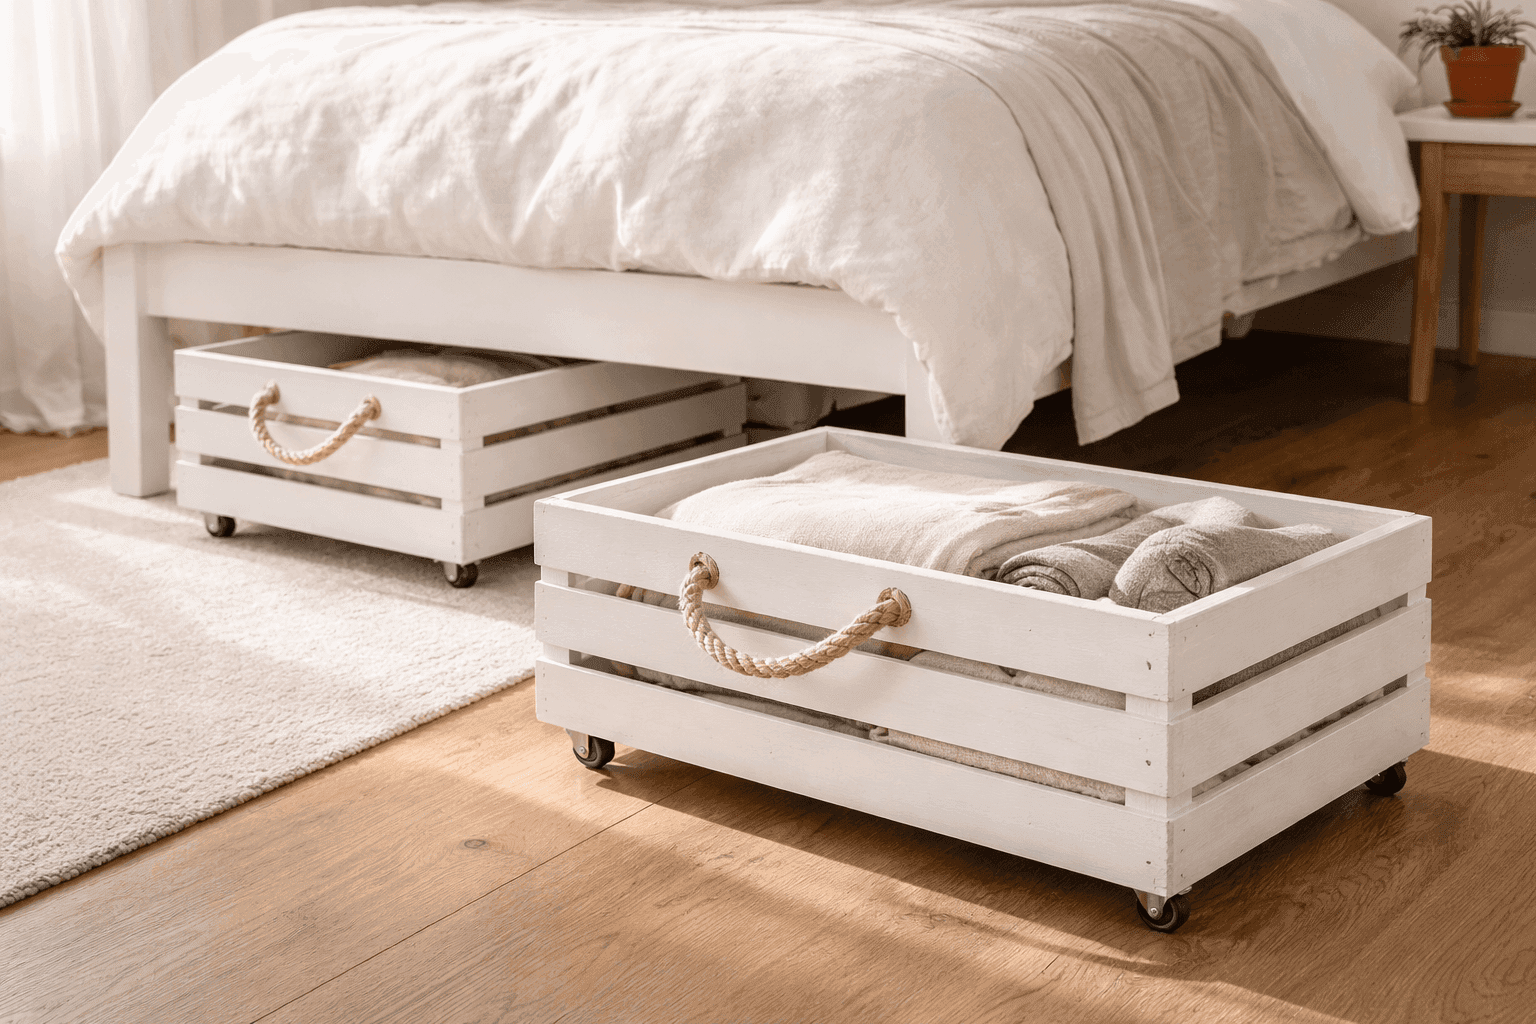
The space under a bed is either the most useful storage in the room or a dark zone where things disappear permanently and dust accumulates undisturbed for years — and the difference between those two outcomes is almost entirely about whether the storage rolls. Plastic bins shoved under a bed require fully making the bed before you can access them, get pushed to the back by shifting bedding, and look exactly like what they are when they appear in any room. A wooden crate on swivel casters with a knotted rope handle pulls out smoothly with one hand, keeps contents visible through the slatted sides, and looks considered and intentional even when it's sitting in the open. Wine crates from a craft store or thrift shop, four swivel casters from the hardware section, and an afternoon of sanding and painting produce a rolling storage piece that costs about $12 and that guests will assume you ordered from a boutique home goods site. Under the bed, under a console table, in a closet — this crate works everywhere plastic bins do and looks infinitely better doing it.
What You Need
- Wooden crate or wine crate — look for solid wood construction with a sturdy base that will support caster attachment; craft stores carry new ones, thrift stores and wine shops often have used ones free or nearly free (~$5–10)
- Swivel casters, 1½" or 2" diameter, qty 4 — low-profile swivel casters keep the finished crate height minimal for maximum under-bed clearance; check that the caster plate fits within the crate base corner without overhanging the sides (~$6–10 for a set of four)
- Wood screws, ¾" length — for attaching caster plates to the crate base; short enough not to penetrate through the base into the crate interior, long enough to grip the wood solidly through the caster mounting holes
- Thick natural rope, ½" diameter — for knotted pull handles; manila or cotton rope in natural fiber looks best against painted or stained wood (~$4–6 for a short length)
- Drill with bit set — for pilot holes at caster mounting points and for drilling the rope handle holes through the crate side slats
- Sandpaper, 120-grit and 220-grit — 120-grit for rough surface prep and splinter removal, 220-grit for the smooth final pass before painting
- Chalk paint or interior latex paint — chalk paint adheres to raw wood without primer and dries to a matte finish that photographs beautifully; white, soft gray, and warm cream are the most versatile color choices (~$8–12 for a small can)
- Clear wax or matte sealer — for protecting the painted finish against the scuffing that comes from regular rolling in and out from under a bed (~$8–10)
How to Build It
- Measure your bed clearance before selecting or purchasing crates — slide a ruler under the bed frame at its lowest point and subtract one inch for comfortable rolling clearance. A crate that fits under the bed when empty may not fit once casters add height, and discovering that after you've painted and assembled everything is a genuinely deflating outcome that a thirty-second measurement prevents entirely.
- Sand the entire crate with 120-grit paper, paying particular attention to the top edges, corner joints, and any rough slatted surfaces that would splinter against hands or snag fabric contents. Follow with a pass of 220-grit for a smooth final surface that takes paint evenly without brush marks catching on grain variations.
- Paint the crate in two coats of chalk paint or interior latex, working the brush into the slatted gaps and corner joints on the first coat and applying the second coat in long, even strokes along the grain direction. Chalk paint dries fast enough that two coats can be completed in a single afternoon session with an hour between coats.
- Seal the painted surface with clear wax or matte sealer once the final paint coat is fully dry — rolling storage takes considerably more physical contact and abrasion than a decorative piece sitting on a shelf, and an unsealed chalk paint finish will show scuff marks and handling wear within the first month of regular use.
- Position caster plates at all four base corners of the crate, centering each plate on the corner with the wheels facing outward. Mark the screw hole positions with a pencil, then pre-drill pilot holes at every mark — crate base wood is often thin and splits under direct screw pressure without pilot holes, and a split base corner is what causes casters to work loose under load over time.
- Attach all four casters with ¾-inch wood screws driven firmly through the mounting plates into the pilot holes, confirming each caster swivels freely through a full 360 degrees after installation. A caster that binds against the crate base or against an adjacent caster won't roll smoothly in any direction, which defeats the entire functional purpose of the build.
- Drill rope handle holes through the center of a side slat on each short end of the crate — two holes spaced about three inches apart per handle location, large enough for your rope diameter to thread through with slight resistance. Drill from the outside face inward to prevent tear-out on the visible exterior surface of the slat.
- Thread a twelve-inch length of rope through both holes from the outside, pulling the ends through to the interior of the crate and finishing each end with a large overhand knot that is too wide to pull back through the hole under tension. The knots are the only thing holding the handle in place under the weight of a loaded crate being pulled across a floor — pull each knot firmly against the interior slat face to confirm it seats solidly before loading the crate with anything.
Professional home organizers who work with under-bed storage systems always line the interior base of rolling crates with a single sheet of acid-free tissue paper or a thin cotton pillowcase before storing any fabric items — the raw wood interior of an unlined crate, even a painted one, transfers tannins and wood oils to fabrics stored in direct contact over time, which shows up as faint yellowish staining on light-colored linens and clothing that is difficult to launder out fully. A single layer of tissue or a pillowcase costs nothing, takes ten seconds to place, and means the contents come out of storage in exactly the condition they went in regardless of how long they've been stored.