DIY Projects

Recent Content

Dig In: Build a Potting Table With Built-In Storage

Dig In: Build a Potting Table With Built-In Storage

Stop potting on your knees. Build a waist-height potting table with lower storage in one afternoon for $50–$80 and transform your spring planting.

Saw, Screw, Plant: Build a Cedar Planter Box

Saw, Screw, Plant: Build a Cedar Planter Box

Cedar boards + 90 minutes + $20 = a classic planter box built to last for years. Build several and finally give your garden the display it deserves.

Harvest & Hang: Build Your Own Herb Drying Racks

Harvest & Hang: Build Your Own Herb Drying Racks

Mesh screen + wood frame + one hour = years of homegrown dried herbs at peak flavor. Build your own drying racks and never waste a harvest again.

A Stanford White Gilded Age Mansion Just Cut to $3.7 Million

A Stanford White Gilded Age Mansion Just Cut to $3.7 Million

The Williams-Butler Mansion — 40 rooms, 29,000 sq ft, designed by Stanford White — just dropped to $3.7M on Buffalo's Millionaires' Row.

Spoon Fed: Make Charming Garden Markers for $5

Spoon Fed: Make Charming Garden Markers for $5

Dollar store spoons + a paint pen = charming garden markers for 25 cents each. Make your entire vegetable garden for under $5 this Tuesday.

Bottle Magic: Transform Wine Bottles Into Glowing Luminaries

Turn empties into elegant light features that add instant winter enchantment

Frosted wine bottles filled with fairy lights creating elegant glowing luminaries on holiday table display
DIY PROJECTS

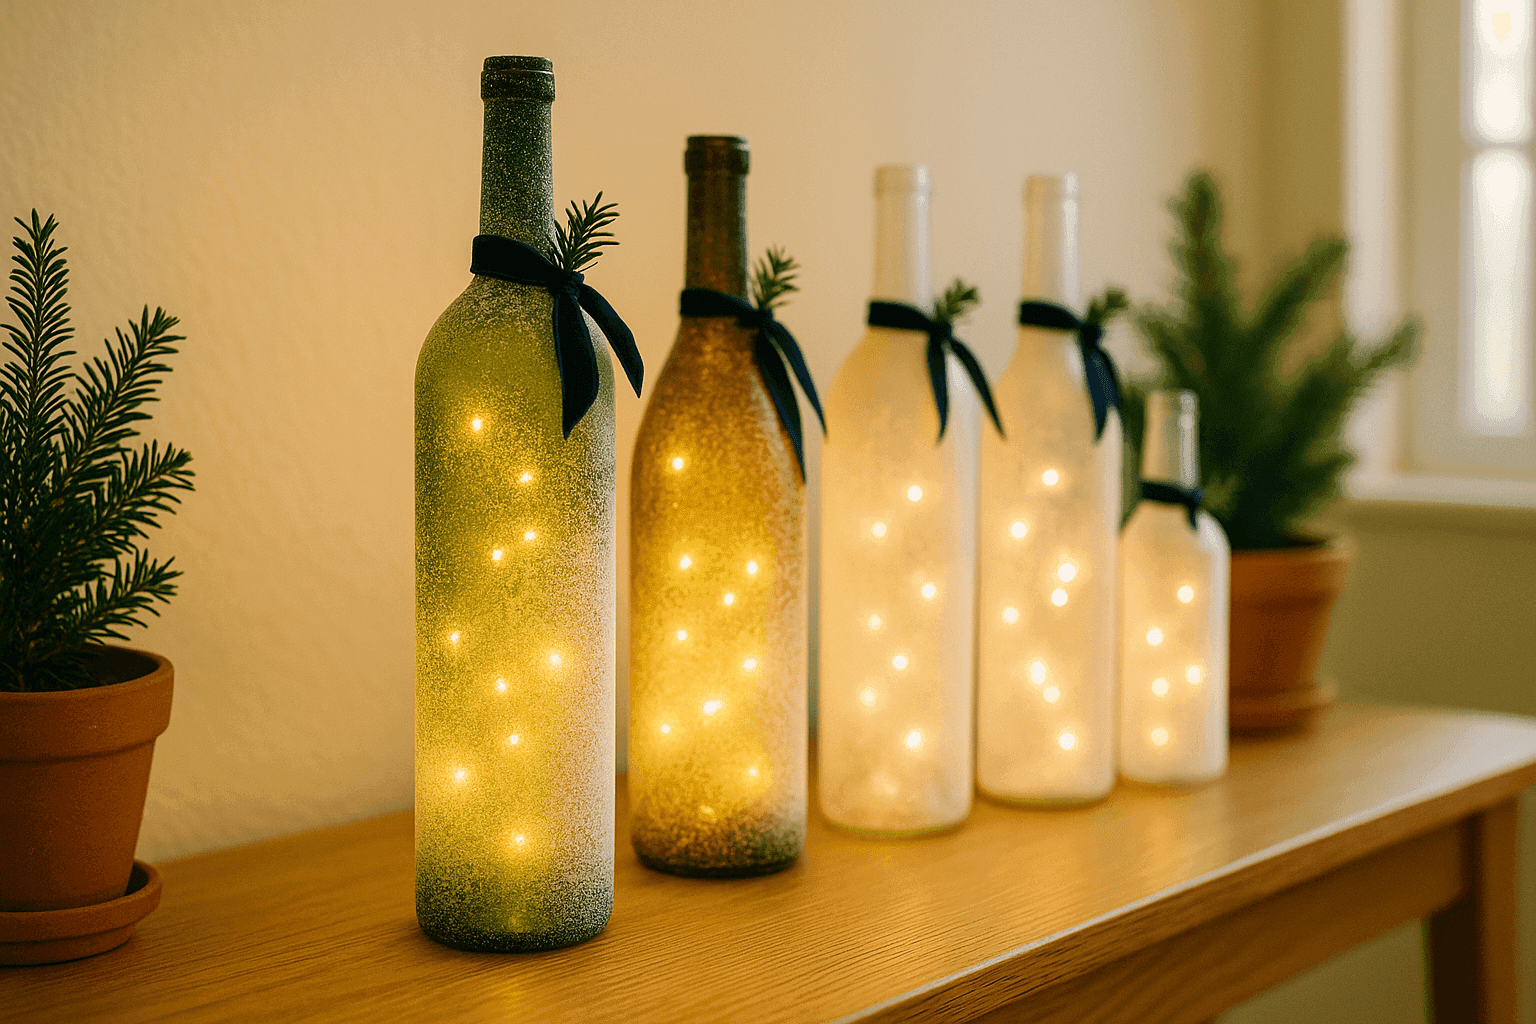
Those empty wine bottles you've been tossing in the recycling? They're about to become the most elegant lighting feature in your holiday decor lineup. The beautiful curves and jewel-tone glass colors of wine bottles create perfect vessels for fairy lights, and when you frost the outside with spray snow, they transform into luminaries that look like expensive boutique finds instead of clever upcycles. This project costs under $15 if you're starting with bottles you already have, takes about 30 minutes including drying time, and creates ambient lighting that's sophisticated enough for formal dinner parties yet cozy enough for everyday winter evenings. The magic happens when you turn on those lights—the frosted glass diffuses the glow into a soft, enchanting radiance that catches everyone's attention and prompts the inevitable question: "Where did you find those?" The best part is you can customize the look endlessly by varying bottle colors, frost coverage, and light colors to match your specific decor style, from icy winter wonderland to warm rustic charm.

What You'll Need

  • Bottle Materials:
    • Empty wine bottles, cleaned with labels removed (3-5 bottles)
    • Choose varied shapes and glass colors for visual interest
    • Goo Gone or rubbing alcohol for stubborn label residue
  • Lighting Elements:
    • Battery-operated LED fairy light strings ($3-5 per bottle)
    • Choose warm white or cool white based on desired ambiance
    • Cork-style light toppers work best for bottle openings
  • Finishing Supplies:
    • Spray snow or frosted glass spray paint ($5-8)
    • Newspaper or drop cloth for spray protection
    • Optional: ribbon, twine, or greenery for decoration
    • Clear sealer spray for durability (optional)

Creation Steps

  1. Clean bottles thoroughly by soaking in warm soapy water to remove labels, then scrubbing away any remaining adhesive with Goo Gone or rubbing alcohol until glass is completely smooth and residue-free.
  2. Dry bottles completely inside and out, ensuring no water droplets remain since moisture will interfere with spray snow adhesion and potentially damage battery-operated lights.
  3. Protect your work surface with newspaper or drop cloth, then position bottles in a well-ventilated area or outdoors where overspray won't damage surrounding surfaces.
  4. Spray bottles with snow or frosted glass paint using light, even coats from 10-12 inches away, rotating bottles to achieve complete coverage or leaving some areas clear for design variation.
  5. Apply 2-3 thin coats rather than one heavy coat, allowing 5-10 minutes drying time between coats to build up the frosted effect gradually and avoid drips or uneven coverage.
  6. Let bottles dry completely for at least 2 hours before handling, ensuring the frosted finish is fully cured and won't smudge when you insert the lights.
  7. Insert battery-operated fairy light strings into each bottle, feeding the lights down carefully so they settle evenly throughout the bottle rather than bunching at the bottom or top.
  8. Arrange your luminaries in groups of varying heights on mantels, tables, or windowsills, turning them on to create that magical glowing effect that transforms ordinary surfaces into enchanting winter displays.
DESIGNER TIP

Professional stylists create more dynamic displays by varying the frost coverage—try leaving the bottom third of some bottles clear so you can see the lights inside creating a glowing base effect, or use stencils to create patterns like snowflakes or trees in the frosted surface. For extra elegance, wrap jute twine or velvet ribbon around bottle necks and tuck in small sprigs of artificial pine or eucalyptus, which hides the battery pack while adding textural interest. Green, amber, and cobalt blue wine bottles each create distinctly different light qualities when frosted—green gives earthy warmth, amber creates golden glow, and blue produces cool winter ambiance, so consider mixing bottle colors for layered lighting effects. If you want these luminaries to last beyond one season, seal the frosted finish with clear acrylic spray which protects against chipping and allows you to gently wipe bottles clean. The ultimate styling trick is grouping luminaries in odd numbers (3, 5, or 7) at varied heights, which creates more visual interest than even numbers or uniform sizing and draws the eye naturally through your display.

Related Content

DIY Projects

24 March 2026

Post

Harvest & Hang: Build Your Own Herb Drying Racks

Mesh screen + wood frame + one hour = years of homegrown dried herbs at peak flavor. Build your own drying racks and never waste a harvest again. ...

DIY Projects

23 March 2026

Post

Can Do: Turn Tin Cans into Hanging Herb Planters

Free tin cans + $8 in rope and plants = a charming hanging herb garden that grows fresh flavor within arm's reach of your kitchen all season long....

DIY Projects

21 March 2026

Post

Breezy & Beautiful: Sew Garden Wind Socks

Fabric tubes + ribbon streamers = whimsical garden movement for under $12 each. Sew these breezy wind socks in one hour and transform any garden bed or patio....

DIY Projects

19 March 2026

Post

Stack & Roll: Build a Rustic Crate Bar Cart

Two wooden crates + casters + an afternoon = a rolling bar cart with real character for $25–$35. Skip the $300 store version and build this instead. ...

DIY Projects

18 March 2026

Post

Build a Garden Trellis in 1 Hour for $10

Your peas and beans need something to climb — and a $10 wooden trellis built in an hour beats every wire alternative at the garden center. ...

DIY Projects

17 March 2026

Post

Make a $6 Shamrock Wreath That Looks Like $30

Why spend $30 on a seasonal wreath? Six dollars in dollar store supplies and 30 minutes makes one just as lush....

DIY Projects

12 March 2026

Post

Press Spring Flowers Into Bookmarks and Art

Flower pressing is the rare craft that asks you to slow down and actually look. Collect today, create in two weeks, keep spring forever. ...

DIY Projects

11 March 2026

Post

Build a Garden Tool Organizer in 90 Minutes for $12

Stop losing tools to the shed floor pile. Build a wall-mounted organizer in 90 minutes for $12 — every tool visible and ready to grab....

DIY Projects

10 March 2026

Post

Make a $8 Spring Wreath That Looks Like $50

Why spend $50 on a store wreath? Eight dollars in dollar store flowers and an hour with a glue gun gets you the same lush, full look. ...

DIY Projects

06 March 2026

Post

Fix Broken Zippers in 2 Minutes for Under $1

Broken zipper pull? Don't toss it — a $1 key ring fixes it in 2 minutes flat. Save your favorite jacket or bag with this stupidly simple repair. ...

DIY Projects

04 March 2026

Post

Corner Space Rescue: Three-Tier Floating Shelves That Actually Fit

Triangular shelves + corner brackets = functional storage in wasted space. Build three custom tiers in 2-3 hours for $30-50 this weekend!...

DIY Projects

04 March 2026

Post

Build It Yourself: Furniture Projects Worth Every Minute`

Furniture Projects Worth Every Minute...

DIY Projects

04 March 2026

Post

A Place for Everything: Custom Storage That Actually Fits

Finally, A Place for Everything...

DIY Projects

04 March 2026

Post

Glow Up: Furniture Transformations That Cost Almost Nothing

Furniture Transformations That Cost Almost Nothing...

DIY Projects

04 March 2026

Post

48 Hours, Done: Weekend Builds Worth Your Saturday

Scoped to start Friday evening and finish before Sunday dinner...
Terms and ConditionsDo Not Sell or Share My Personal InformationPrivacy PolicyPrivacy NoticeAccessibility NoticeUnsubscribe
Copyright © 2026 DIY HomeBoost