


Build a Show-Stopping Tiered Pie Display Stand
Create a custom wooden stand that showcases all your Thanksgiving pies like the masterpieces they are
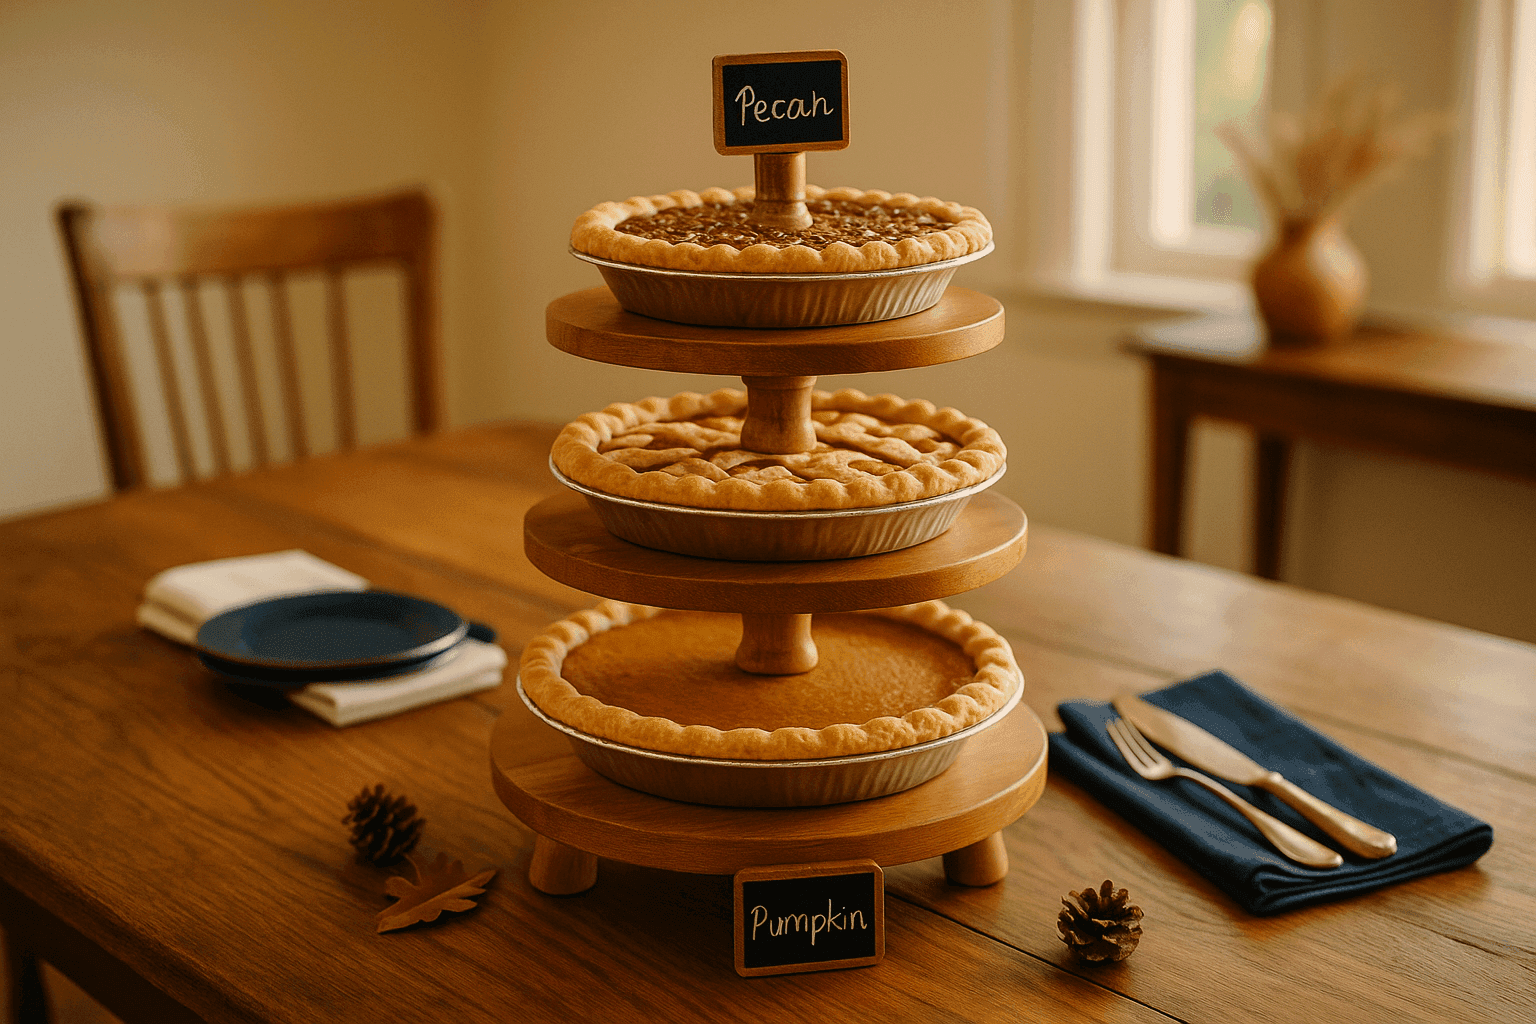
Every Thanksgiving I watch people awkwardly crowd around the dessert table trying to figure out which pie is which while precious pumpkin and pecan sit squashed together like an afterthought, and I think about how a proper tiered display stand would solve everything while making those homemade pies look as impressive as they deserve. Building a wooden pie stand is a satisfying weekend project that costs $30-40 in materials but delivers a centerpiece-worthy display you'll use year after year for holidays, potlucks, and celebrations. The three-tiered design allows each pie to shine individually while creating dramatic height that draws the eye and makes your dessert spread feel abundant and celebratory rather than utilitarian. I built my first stand five years ago using basic pine boards and simple joinery, and it's become such a beloved part of our holiday tradition that family members now request it specifically when planning dessert logistics. Beyond the practical function of organized pie presentation, there's genuine woodworking satisfaction in creating a piece that combines utility with beauty—those perfectly spaced tiers, the smooth sanded surfaces, the little details like routed edges and small chalkboard labels that elevate the whole project from basic to genuinely special.
What You'll Need
- Wood Materials:
- Three 12-inch diameter round wood plaques or circles (for tiers)
- Or 1x12 pine board to cut your own circles
- One 1x4 pine board, 4 feet long (for vertical posts)
- Wood dowels: 1-inch diameter, 12 inches total length
- Small wooden blocks for label holders (optional)
- Hardware & Fasteners:
- Wood screws (2-inch and 1½-inch)
- Wood glue
- Sandpaper (80, 120, and 220 grit)
- Wood stain or paint in your choice of finish
- Polyurethane or food-safe sealer
- Tools Required:
- Circular saw or jigsaw for cutting circles
- Drill with various bits including spade or Forstner bit
- Measuring tape and pencil
- Clamps for holding during assembly
- Optional: router for decorative edge detail
- Total Cost: $30-40 for materials
Building Steps
- Cut your tier circles if not using pre-made rounds by marking 12-inch, 10-inch, and 8-inch circles on your pine board using a compass or string method, then cutting carefully with a jigsaw. Pre-made craft wood rounds save time but custom-cut circles allow perfect sizing for your specific pie plates.
- Sand thoroughly starting with 80-grit to smooth any rough cuts and remove splinters, progressing through 120-grit and finishing with 220-grit for silky surfaces that feel premium to touch. Good sanding makes the difference between hobby project and heirloom-quality piece.
- Create center posts by cutting dowels into three pieces: one 6-inch piece between bottom and middle tier, one 5-inch piece between middle and top tier. These graduated heights create the tiered effect while ensuring visual balance and structural stability.
- Drill center holes using a 1-inch spade or Forstner bit to create sockets for dowel posts in the center of each tier, drilling about ½ inch deep on the bottom of upper tiers and top of lower tiers. Test-fit dowels to ensure snug connection before gluing.
- Route decorative edges if desired by running a roundover or ogee bit around the perimeter of each tier, which adds professional detail and prevents sharp corners that could damage pie crusts. This optional step elevates the visual sophistication significantly.
- Apply your finish by staining or painting all pieces before assembly, applying 2-3 coats with light sanding between for smooth results. Natural wood stain showcases grain beautifully, while painted finishes in cream or navy create more formal elegance—choose based on your overall aesthetic.
- Seal with food-safe finish using polyurethane or beeswax-based sealer that protects wood from moisture and makes cleanup easy after inevitable pie drips. Multiple thin coats work better than one thick application that might feel tacky or sticky.
- Assemble the stand by applying wood glue to dowel ends and fitting them into drilled sockets, stacking tiers in order from largest to smallest while ensuring everything aligns properly. Add small chalkboard paint labels or wooden tags at the base of each tier so guests know which delicious pie they're choosing.
Advanced woodworkers elevate this basic design by incorporating clever details that increase functionality and beauty. Consider cutting small grooves or adding thin wooden lips around the perimeter of each tier to prevent pie plates from sliding—just a ¼-inch raised edge makes a huge difference in stability. Professional furniture makers also recommend adding felt or cork pads to the underside of the bottom tier to protect table surfaces and prevent scratching. For truly custom results, route a decorative channel around each tier about 1 inch from the edge, then inlay contrasting wood strips or paint the groove in metallic gold for an upscale two-tone effect. The most thoughtful design addition is making the stand modular by using removable dowel posts—drill the dowel holes all the way through the tiers and use longer dowels with decorative finials on top that can be unscrewed for compact storage. This means your stand breaks down flat for the 11 months it's not displaying Thanksgiving pies, solving the storage problem that plagues most seasonal serving pieces.


