DIY Projects

Recent Content

Space Savers: Make Your Own Seed Tape for $5

Space Savers: Make Your Own Seed Tape for $5

Flour paste + toilet paper + tiny seeds = perfectly spaced rows with zero thinning. Make a full season of seed tape in 30 minutes for under $5.

Rise Up: Build a Garden Trellis Arch This Weekend

Rise Up: Build a Garden Trellis Arch This Weekend

Stop growing flat when you could grow up. A handbuilt trellis arch doubles your garden space, supports serious vine crops, and looks stunning all season.

Stand Tall: Build a Wooden Plant Stand for $10

Stand Tall: Build a Wooden Plant Stand for $10

Four legs + a few cross braces + 90 minutes = a minimalist plant stand that looks $60 and costs $10 to build. Make three at different heights and go.

Steeped in Green: Succulents in a Vintage Teacup

Steeped in Green: Succulents in a Vintage Teacup

A thrifted teacup, a handful of gravel, and one tiny succulent — the desk décor that looks precious, costs under $15, and barely needs watering.

Counter Culture: Turn a Dresser into a Kitchen Island

Counter Culture: Turn a Dresser into a Kitchen Island

A thrifted dresser + butcher block top + locking casters = a custom kitchen island for $60–$100. Skip the $400 store version and build character instead.

Contact Paper Countertop Refresh: $10 Bathroom Transformation

Transform dated countertops into marble masterpieces using dollar store contact paper

Bathroom vanity counter covered with elegant marble-look contact paper creating high-end appearance for minimal cost
DIY PROJECTS

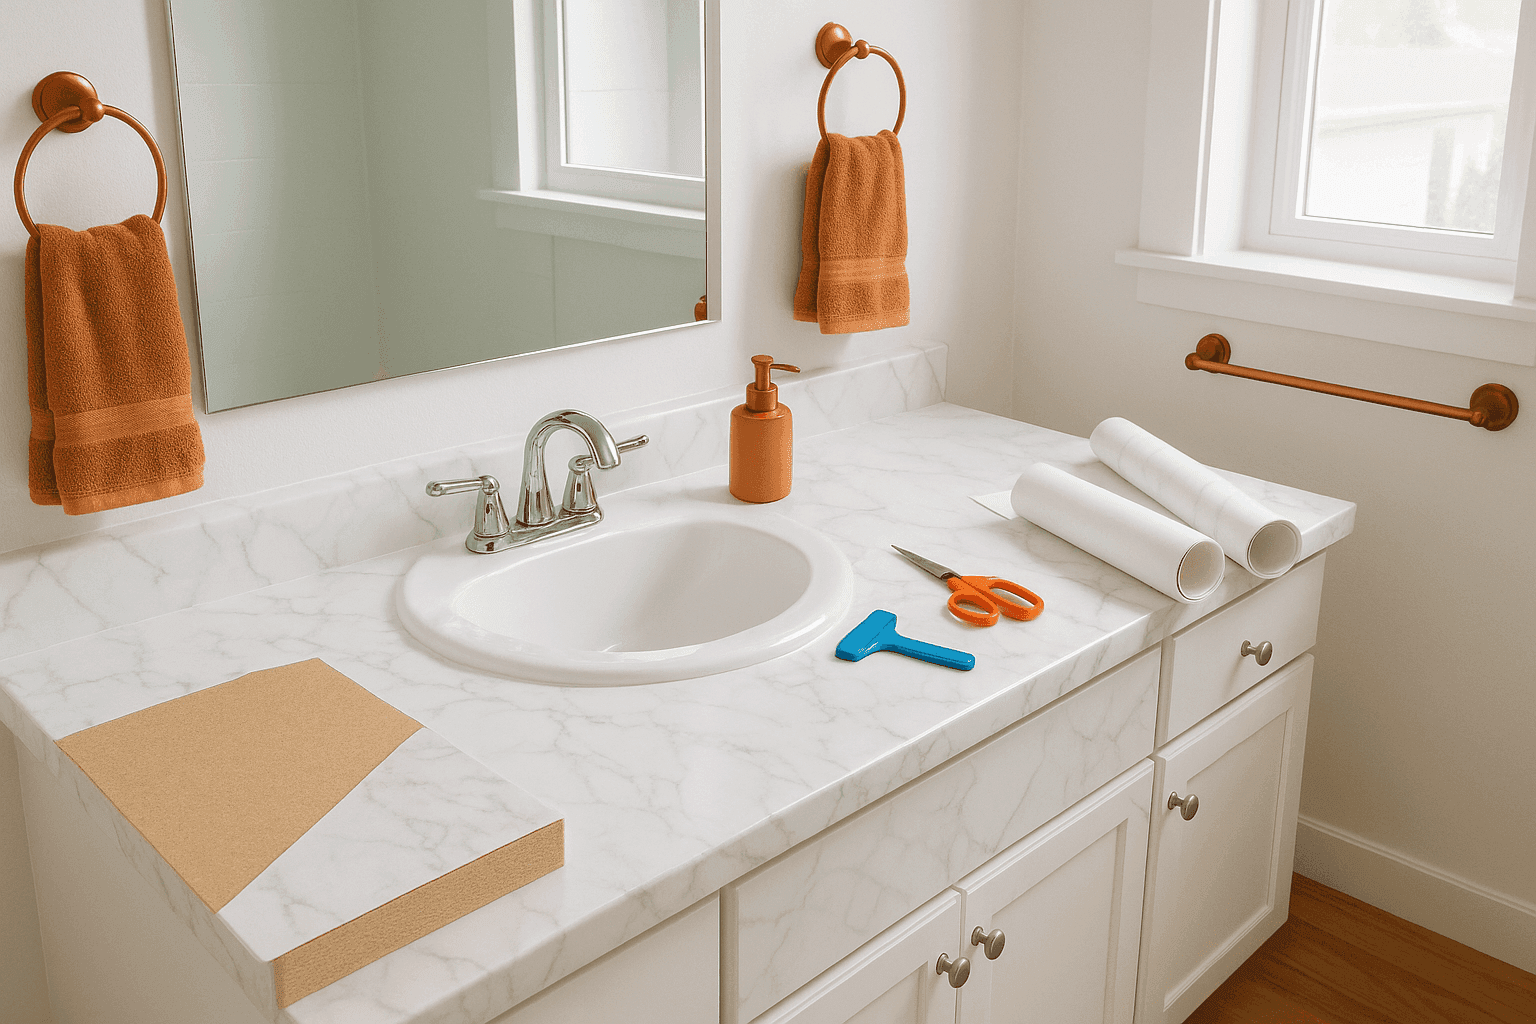
Dated bathroom countertops can make your entire space feel tired and outdated, yet professional replacement costs thousands of dollars and creates days of disruption you simply don't have time or budget for right now. The brilliant secret hiding in dollar store aisles is marble or granite-look contact paper that transforms worn laminate surfaces into convincing stone lookalikes for under $10 per bathroom counter. This temporary solution works perfectly for renters who can't make permanent changes, homeowners waiting to save for real renovations, or anyone who wants an immediate visual upgrade without contractor quotes and construction chaos. The adhesive backing makes application surprisingly straightforward while remaining removable when you're ready for permanent upgrades, meaning you get instant gratification and dramatic transformation without commitment or significant investment.

Budget Makeover Supplies

  • Contact Paper: Marble or granite-look adhesive paper from dollar store ($1-2 per roll, 2-3 rolls per standard bathroom counter)
  • Cleaning Supplies: All-purpose cleaner, rubbing alcohol, clean rags, degreaser for stubborn residue
  • Application Tools: Utility knife or scissors, measuring tape, straight edge or ruler, credit card or squeegee
  • Prep Materials: Fine-grit sandpaper for rough spots, painter's tape for marking edges
  • Finishing Touches: Clear acrylic sealer spray for added durability (optional but recommended for high-use areas)

Application Process

  1. Clean countertop thoroughly with degreaser and rubbing alcohol, removing all soap residue and oils
  2. Sand any rough spots lightly to create smooth surface for contact paper adhesion
  3. Measure counter dimensions carefully, adding 2 inches to each measurement for overhang and adjustments
  4. Cut contact paper to size on flat surface, using straight edge for clean, professional lines
  5. Peel back just 2-3 inches of backing paper to start, positioning adhesive side carefully on counter edge
  6. Smooth as you go using credit card or squeegee, working slowly to prevent air bubbles
  7. Continue peeling backing gradually while smoothing, never removing entire backing at once
  8. Trim excess with utility knife, cutting along edges for seamless finish that wraps slightly underneath
DESIGNER TIP

Professional installers always work in small sections rather than trying to apply large pieces all at once, which inevitably creates bubbles and wrinkles that ruin the high-end appearance you're trying to achieve. For the most convincing faux marble or granite look, choose patterns with realistic veining and color variation rather than perfectly uniform designs that scream "fake." The secret to durability in high-traffic bathrooms is sealing edges with clear acrylic spray after installation, which prevents moisture from creeping under contact paper and causing peeling at corners where water exposure is highest.

Related Content

DIY Projects

01 April 2026

Post

Stand Tall: Build a Wooden Plant Stand for $10

Four legs + a few cross braces + 90 minutes = a minimalist plant stand that looks $60 and costs $10 to build. Make three at different heights and go. ...

DIY Projects

04 April 2026

Post

Set in Stone: Make Handprint Stepping Stones with Kids

A mold, a bag of concrete, and one small hand — the $15 garden project that takes 45 minutes to make and becomes one of your most treasured possessions. ...

DIY Projects

04 April 2026

Post

Mirror, Mirror: Make Disco Ball Planters That Dazzle

Make Disco Ball Planters That Dazzle...

DIY Projects

07 April 2026

Post

For the Birds: Make Homemade Suet Cakes for $10

Lard + peanut butter + seeds + a muffin tin = 12 homemade suet cakes for $10. Make a batch in 20 minutes and watch the birds go absolutely frantic....

DIY Projects

15 April 2026

Post

Hang It Up: Build a Wall-Mounted Herb Drying Rack

Angled dowels + a 1x6 backboard + one hour = a herb drying rack that preserves your harvest and looks great doing it....

DIY Projects

07 May 2026

Post

Paint Meditative Watercolor Plant Portraits for $15

One garden leaf, a brush, and twenty minutes of slow looking — a watercolor botanical practice that costs $15 and lasts all season....

DIY Projects

06 May 2026

Post

Build a Wooden Garden Tool Caddy for $12

One 1×8 board, a jigsaw, and 90 minutes builds the garden caddy that ends the shed round-trip forever — for just $12. ...

DIY Projects

05 May 2026

Post

Make a Paper Flower Garland for Parties for $8

Stack, fold, fluff — fifteen tissue paper blooms strung on jute twine transforms any outdoor space into a party for just $8. ...

DIY Projects

05 May 2026

Post

Make a Tissue Paper Fiesta Banner for Under $5

Stack tissue paper, fold accordion-style, snip a pattern, unfold — twelve fiesta banner panels for under $5 in about an hour....

DIY Projects

04 May 2026

Post

Turn Wooden Crates into Rolling Under-Bed Storage for $12

A wooden crate + four swivel casters + a knotted rope handle = rolling under-bed storage that looks boutique for just $12. ...

DIY Projects

02 May 2026

Post

Sew Lavender Sachets for Drawers & Closets for $8

Tuck dried lavender sachets in every drawer and closet for natural scent and moth protection that lasts all year — whole batch under $8....

DIY Projects

27 April 2026

Post

Turn Thrift Store Frames into Serving Trays for $8

Thrift store frame + two drawer pulls + decorative paper = a boutique-worthy serving tray for $8. Swap the insert anytime. ...

DIY Projects

22 April 2026

Post

Feed the Birds: Build a Platform Bird Feeder for $12

A base board, four corner lips, two posts, and a roof — the $12 platform bird feeder built in 90 minutes that attracts more species than any feeder you can buy....

DIY Projects

21 April 2026

Post

Banner Day: Sew Fabric Bunting Banners for $8

Fabric scraps + pinking shears + ribbon + one straight stitch per flag = a handmade bunting banner for $8 that guests always ask where you bought....

DIY Projects

18 April 2026

Post

Silver Lining: Make Vintage Silverware Wind Chimes

Thrift store silverware + driftwood + an hour = a wind chime that sounds better than boutique versions three times the price....
Terms and ConditionsDo Not Sell or Share My Personal InformationPrivacy PolicyPrivacy NoticeAccessibility NoticeUnsubscribe
Copyright © 2026 DIY HomeBoost