DIY Projects

Recent Content

Space Savers: Make Your Own Seed Tape for $5

Space Savers: Make Your Own Seed Tape for $5

Flour paste + toilet paper + tiny seeds = perfectly spaced rows with zero thinning. Make a full season of seed tape in 30 minutes for under $5.

Rise Up: Build a Garden Trellis Arch This Weekend

Rise Up: Build a Garden Trellis Arch This Weekend

Stop growing flat when you could grow up. A handbuilt trellis arch doubles your garden space, supports serious vine crops, and looks stunning all season.

Stand Tall: Build a Wooden Plant Stand for $10

Stand Tall: Build a Wooden Plant Stand for $10

Four legs + a few cross braces + 90 minutes = a minimalist plant stand that looks $60 and costs $10 to build. Make three at different heights and go.

Steeped in Green: Succulents in a Vintage Teacup

Steeped in Green: Succulents in a Vintage Teacup

A thrifted teacup, a handful of gravel, and one tiny succulent — the desk décor that looks precious, costs under $15, and barely needs watering.

Counter Culture: Turn a Dresser into a Kitchen Island

Counter Culture: Turn a Dresser into a Kitchen Island

A thrifted dresser + butcher block top + locking casters = a custom kitchen island for $60–$100. Skip the $400 store version and build character instead.

Groovy Vibes: Create Custom Tie-Dye Beach Towels

Transform plain towels into psychedelic masterpieces that bring retro fun to every beach day

Colorful tie-dye beach towels in bright swirl patterns with tie-dye kit supplies and crafting setup
DIY Projects

There's something absolutely magical about watching plain white cotton transform into swirling kaleidoscopes of color – it's like being part of a 1960s art revolution right in your own backyard, except this time you get to take the masterpieces to the beach. I started tie-dyeing with my kids three summers ago when we were looking for a creative way to spend a rainy afternoon, and what began as a simple craft project has become our most anticipated summer tradition that produces unique towels no store could ever replicate. The beauty of tie-dye lies in its perfect combination of artistic expression and practical function; you're not just creating art, you're making personalized beach essentials that tell a story and spark conversations wherever you spread them out. Whether you're crafting with children who love the messy magic of color mixing, teenagers looking for Instagram-worthy DIY projects, or adults rediscovering the joy of hands-on creativity, tie-dyeing offers that rare satisfaction of making something both beautiful and useful. Once you see how excited people get when they spot your one-of-a-kind towels at the pool or beach, you'll understand why this groovy craft never goes out of style and always brings people together in the spirit of creative fun.

Tie-Dye Essentials

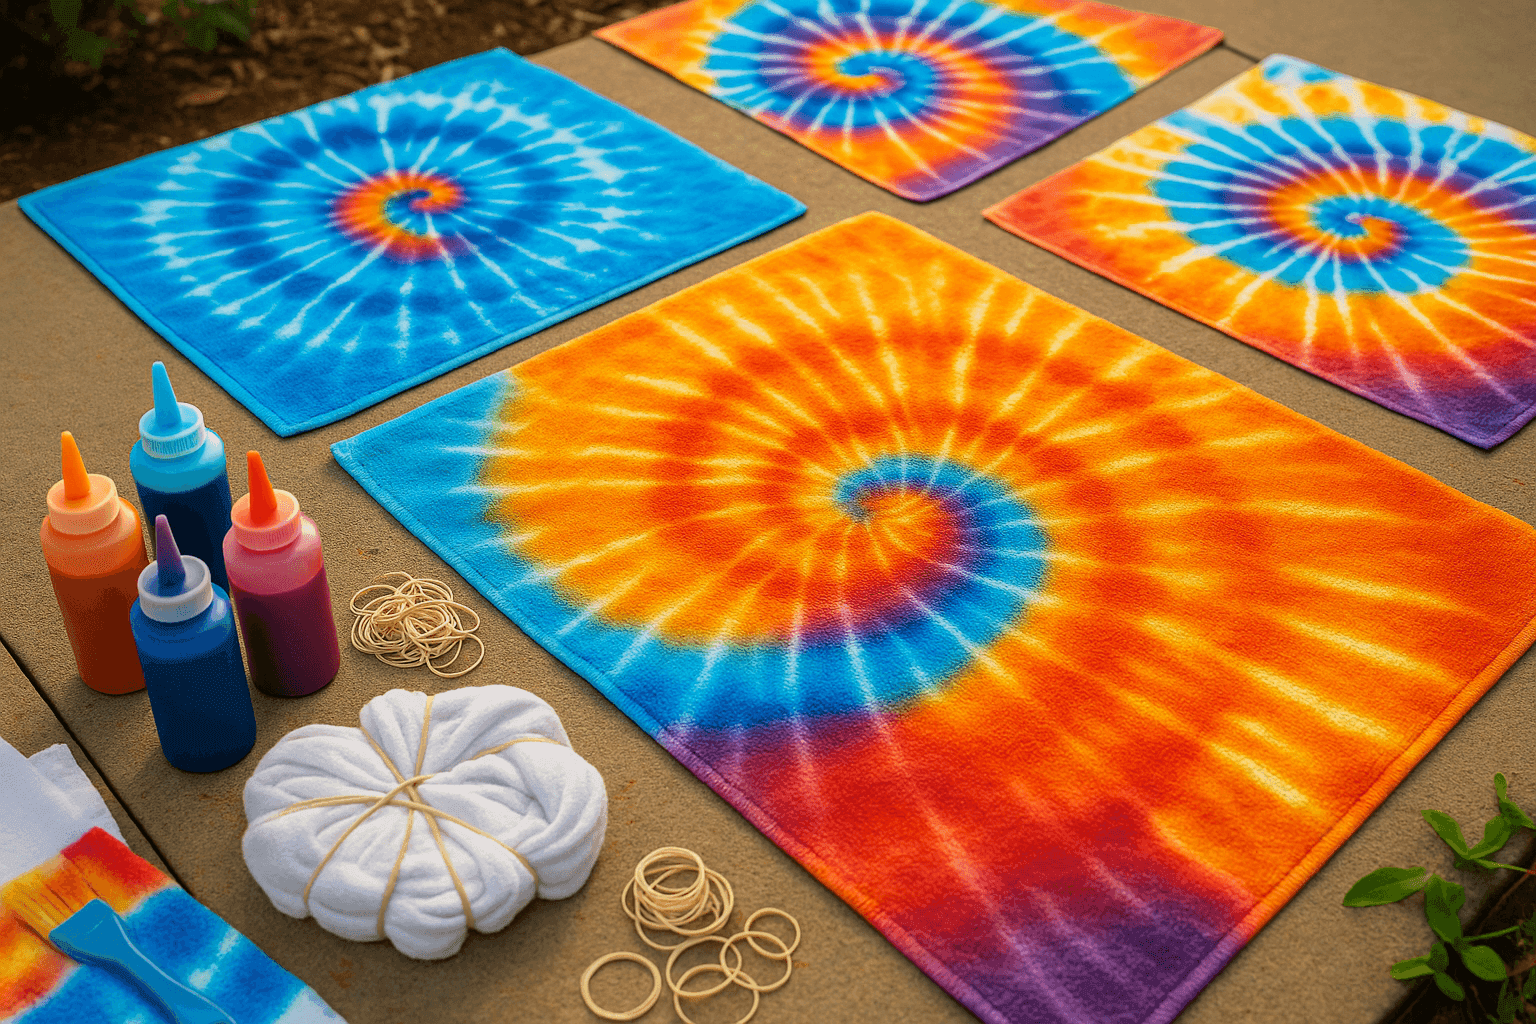
  • Tie-Dye Kit: Complete kit with multiple colors or individual fabric dyes ($10-30)
  • Plain Cotton Towels: White or light-colored 100% cotton beach towels ($15-50)
  • Rubber Bands: Various sizes for creating different pattern effects ($3-8)
  • Squeeze Bottles: For precise dye application and color control ($5-15)
  • Protective Gear: Rubber gloves, aprons, and old clothes ($8-20)
  • Work Surface: Plastic tablecloth, tarp, or disposable table covering ($5-15)
  • Mixing Supplies: Measuring cups, spoons, and mixing containers ($10-25)
  • Fixative Agent: Soda ash or salt to help colors set permanently ($5-12)

Creation Process

  1. Prepare work area with plastic covering and gather all supplies
  2. Wash towels to remove sizing and ensure better dye absorption
  3. Create patterns by folding, twisting, or bunching towels with rubber bands
  4. Mix dye colors according to kit instructions in separate squeeze bottles
  5. Apply dye systematically, working from light to dark colors
  6. Wrap dyed towels in plastic and let cure for 6-24 hours
  7. Rinse thoroughly until water runs clear, then wash separately
  8. Dry completely and admire your unique psychedelic creations
DESIGNER TIP

Professional tie-dye artists create the most vibrant, long-lasting results by pre-soaking fabric in soda ash solution before applying dye – this helps colors bond permanently to the fibers. The key to stunning patterns is restraint with rubber band placement: fewer bands often create more dramatic effects than over-binding. Try the classic "spiral" by pinching the center and twisting, the "bullseye" with concentric rubber band circles, or "stripes" by accordion-folding. Also, apply dye liberally but avoid over-saturating to prevent muddy colors where different dyes meet. For the most professional results, use complementary color combinations (like blue and orange or purple and yellow) rather than mixing all colors together, which can create brown. Remember that colors will appear more muted when dry, so go bolder than you think you need during the dyeing process.

Related Content

DIY Projects

01 April 2026

Post

Stand Tall: Build a Wooden Plant Stand for $10

Four legs + a few cross braces + 90 minutes = a minimalist plant stand that looks $60 and costs $10 to build. Make three at different heights and go. ...

DIY Projects

04 April 2026

Post

Set in Stone: Make Handprint Stepping Stones with Kids

A mold, a bag of concrete, and one small hand — the $15 garden project that takes 45 minutes to make and becomes one of your most treasured possessions. ...

DIY Projects

04 April 2026

Post

Mirror, Mirror: Make Disco Ball Planters That Dazzle

Make Disco Ball Planters That Dazzle...

DIY Projects

07 April 2026

Post

For the Birds: Make Homemade Suet Cakes for $10

Lard + peanut butter + seeds + a muffin tin = 12 homemade suet cakes for $10. Make a batch in 20 minutes and watch the birds go absolutely frantic....

DIY Projects

15 April 2026

Post

Hang It Up: Build a Wall-Mounted Herb Drying Rack

Angled dowels + a 1x6 backboard + one hour = a herb drying rack that preserves your harvest and looks great doing it....

DIY Projects

06 May 2026

Post

Build a Wooden Garden Tool Caddy for $12

One 1×8 board, a jigsaw, and 90 minutes builds the garden caddy that ends the shed round-trip forever — for just $12. ...

DIY Projects

05 May 2026

Post

Make a Paper Flower Garland for Parties for $8

Stack, fold, fluff — fifteen tissue paper blooms strung on jute twine transforms any outdoor space into a party for just $8. ...

DIY Projects

05 May 2026

Post

Make a Tissue Paper Fiesta Banner for Under $5

Stack tissue paper, fold accordion-style, snip a pattern, unfold — twelve fiesta banner panels for under $5 in about an hour....

DIY Projects

04 May 2026

Post

Turn Wooden Crates into Rolling Under-Bed Storage for $12

A wooden crate + four swivel casters + a knotted rope handle = rolling under-bed storage that looks boutique for just $12. ...

DIY Projects

02 May 2026

Post

Sew Lavender Sachets for Drawers & Closets for $8

Tuck dried lavender sachets in every drawer and closet for natural scent and moth protection that lasts all year — whole batch under $8....

DIY Projects

27 April 2026

Post

Turn Thrift Store Frames into Serving Trays for $8

Thrift store frame + two drawer pulls + decorative paper = a boutique-worthy serving tray for $8. Swap the insert anytime. ...

DIY Projects

22 April 2026

Post

Feed the Birds: Build a Platform Bird Feeder for $12

A base board, four corner lips, two posts, and a roof — the $12 platform bird feeder built in 90 minutes that attracts more species than any feeder you can buy....

DIY Projects

21 April 2026

Post

Banner Day: Sew Fabric Bunting Banners for $8

Fabric scraps + pinking shears + ribbon + one straight stitch per flag = a handmade bunting banner for $8 that guests always ask where you bought....

DIY Projects

18 April 2026

Post

Silver Lining: Make Vintage Silverware Wind Chimes

Thrift store silverware + driftwood + an hour = a wind chime that sounds better than boutique versions three times the price....

DIY Projects

13 April 2026

Post

Jar of Light: Make Mason Jar Hanging Lanterns

Wire handles + battery tea lights + mason jars hung at varying heights = enchanting outdoor lighting for $1–$2 per lantern. Light up the patio tonight....
Terms and ConditionsDo Not Sell or Share My Personal InformationPrivacy PolicyPrivacy NoticeAccessibility NoticeUnsubscribe
Copyright © 2026 DIY HomeBoost