


Kitchen Heirloom: Build a Recipe Box Worth Passing Down
Preserve family recipes in a beautiful handmade keepsake
Family recipes scribbled on index cards and shoved in drawers deserve better than gradually yellowing in forgotten piles, while store-bought recipe boxes lack the character and personalization that makes heirlooms meaningful. A handmade wooden recipe box transforms those treasured recipes into an organized collection housed in something beautiful enough to display on your counter and sturdy enough to pass down through generations. While pre-made recipe boxes at kitchen stores cost $40-60 for flimsy materials, building your own from quality wood costs $20-30 and creates something substantially better that reflects your personal style. This two-hour woodworking project teaches fundamental skills—measuring precisely, creating clean joints, installing hinges—that apply to countless other builds while producing something genuinely useful every single day. The hinged lid keeps cards clean and protected, custom dividers organize recipes by category exactly how you think about cooking, and the solid wood construction improves with age rather than falling apart after a few years. Beyond the practical benefits, there's something deeply satisfying about reaching for a recipe box you built with your own hands, knowing that decades from now someone else will do the same while thinking of you.
Materials & Tools
- Wood Materials ($15-25):
- 1x6 pine or poplar board, 6 feet long (box sides)
- 1x4 board, 2 feet long (dividers and lid)
- Small piece of 1/4" plywood or thin board (bottom)
- Optional: nicer hardwood like oak or cherry for heirloom quality
- Hardware ($5-8):
- Small hinges (2-inch brass or nickel)
- Wood glue (waterproof Titebond recommended)
- Finish nails or brad nails
- Small latch or magnetic catch (optional)
- Finish Supplies:
- Sandpaper (120, 180, 220-grit)
- Wood stain or paint
- Polyurethane or furniture wax
- Felt liner for bottom (optional)
- Tools Needed:
- Saw (hand saw, miter saw, or circular saw)
- Measuring tape, pencil, square
- Drill with pilot bits
- Hammer or nail gun
- Clamps (at least 2)
Build Your Box
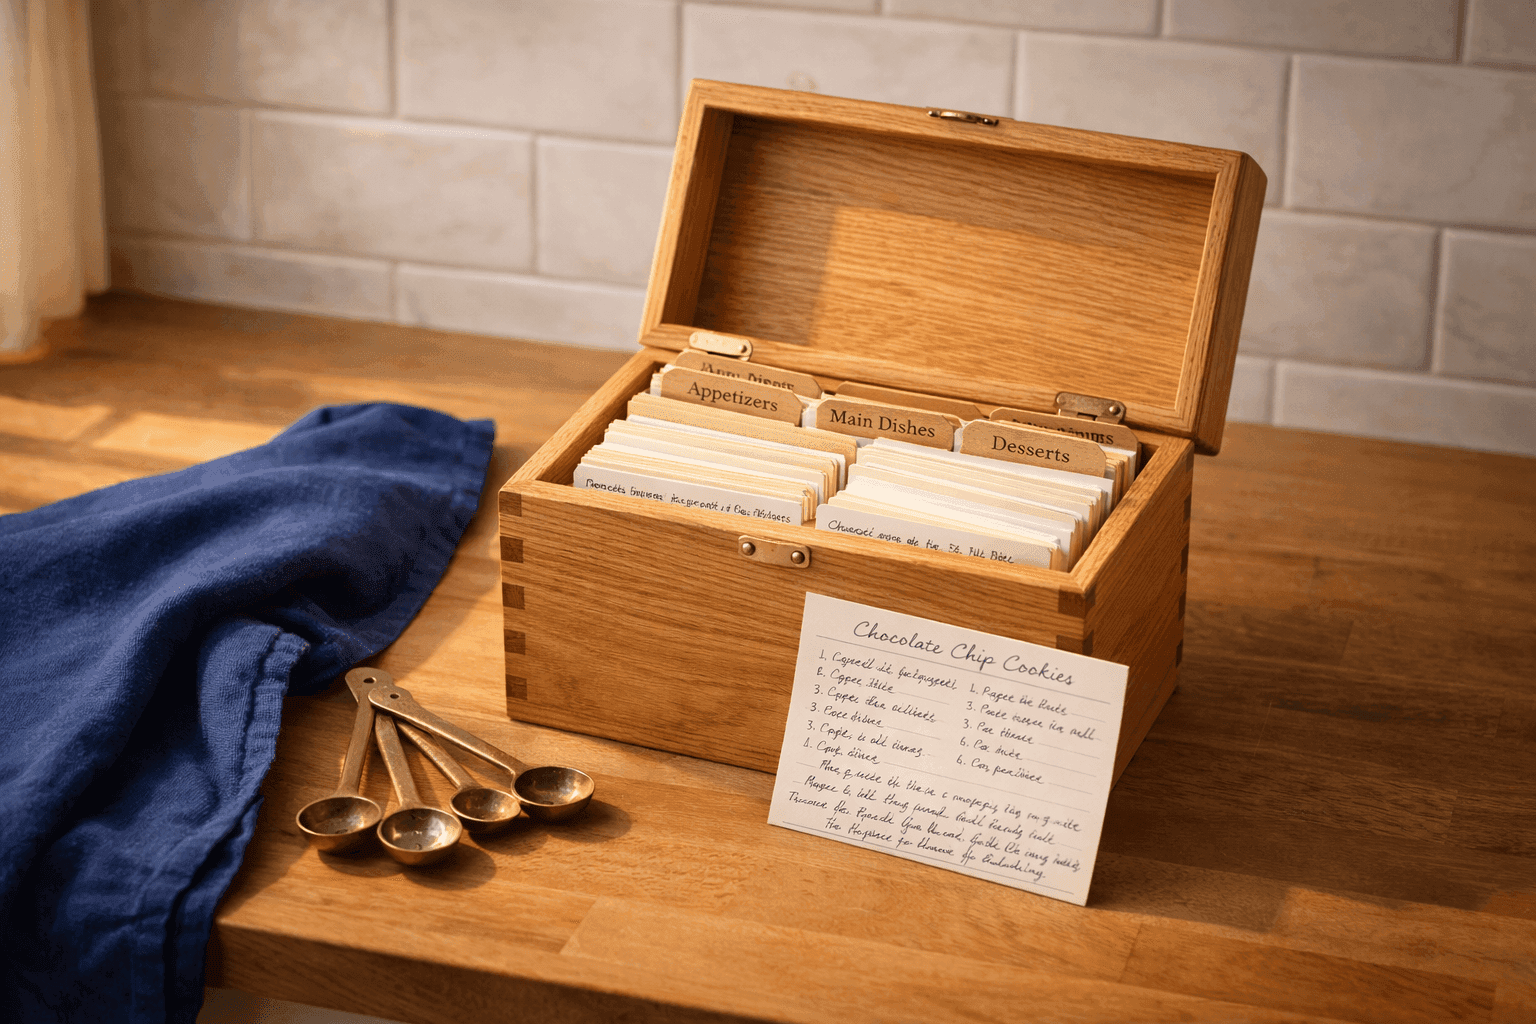
- Measure standard 4x6-inch recipe cards and plan your box dimensions slightly larger—most recipe boxes are about 5 inches wide, 7 inches deep, and 4-5 inches tall to comfortably hold cards with room for dividers.
- Cut all pieces precisely using your measurements: two side pieces, front and back pieces, bottom panel, lid, and 3-5 divider cards from thin wood or sturdy cardstock that organize categories like Appetizers, Main Dishes, Desserts, and Sides.
- Sand every piece thoroughly with progressively finer grits (120, 180, 220) before assembly, because getting into corners after the box is built becomes nearly impossible without compromising your finish quality.
- Assemble the box body by applying wood glue to edges and clamping pieces together at perfect right angles, then reinforce corners with finish nails once glue starts setting—this combination creates joints strong enough for generations.
- Attach the bottom panel by gluing and nailing it to the assembled box frame, ensuring it sits flush and creates a stable base that won't warp or separate even with decades of use.
- Install hinges on the back edge, positioning them about 1 inch from each side for balanced lid support—pre-drill screw holes to prevent splitting the wood, which ruins otherwise perfect projects.
- Finish with your choice of stain to highlight natural wood grain or paint that matches your kitchen aesthetic, then seal with 2-3 coats of polyurethane for protection against kitchen moisture and daily handling.
- Personalize with wood-burned names, painted designs, or decorative hardware that transforms a functional box into a meaningful heirloom that tells your family's story through both its contents and its construction.
Master woodworkers recommend adding small details that elevate functional projects into heirlooms worth keeping. Route a shallow groove inside the front panel to hold a decorative recipe card that displays your favorite family recipe permanently, or cut a small viewing window in the lid covered with acrylic sheet to showcase a special recipe card. For dividers, use index tabs labeled with categories that make sense for your cooking style rather than generic store-bought options—maybe "Grandma's Favorites," "Quick Weeknight," "Special Occasions," and "Tried & True." Consider building matching boxes for adult children as wedding gifts, pre-filling them with family recipe cards written in your handwriting—it becomes one of those gifts that grows more precious with time. Line the bottom with felt to prevent cards from sliding around and add small rubber feet underneath to protect counter surfaces. The beauty of building your own is you can customize dimensions for oversized cards, add extra depth for recipes clipped from magazines, or create slots for measuring spoons that always stay with your recipes.


