


Make a $6 Shamrock Wreath That Looks Like $30
Thirty minutes, a dollar store run, and your front door is ready for St. Patrick's Day
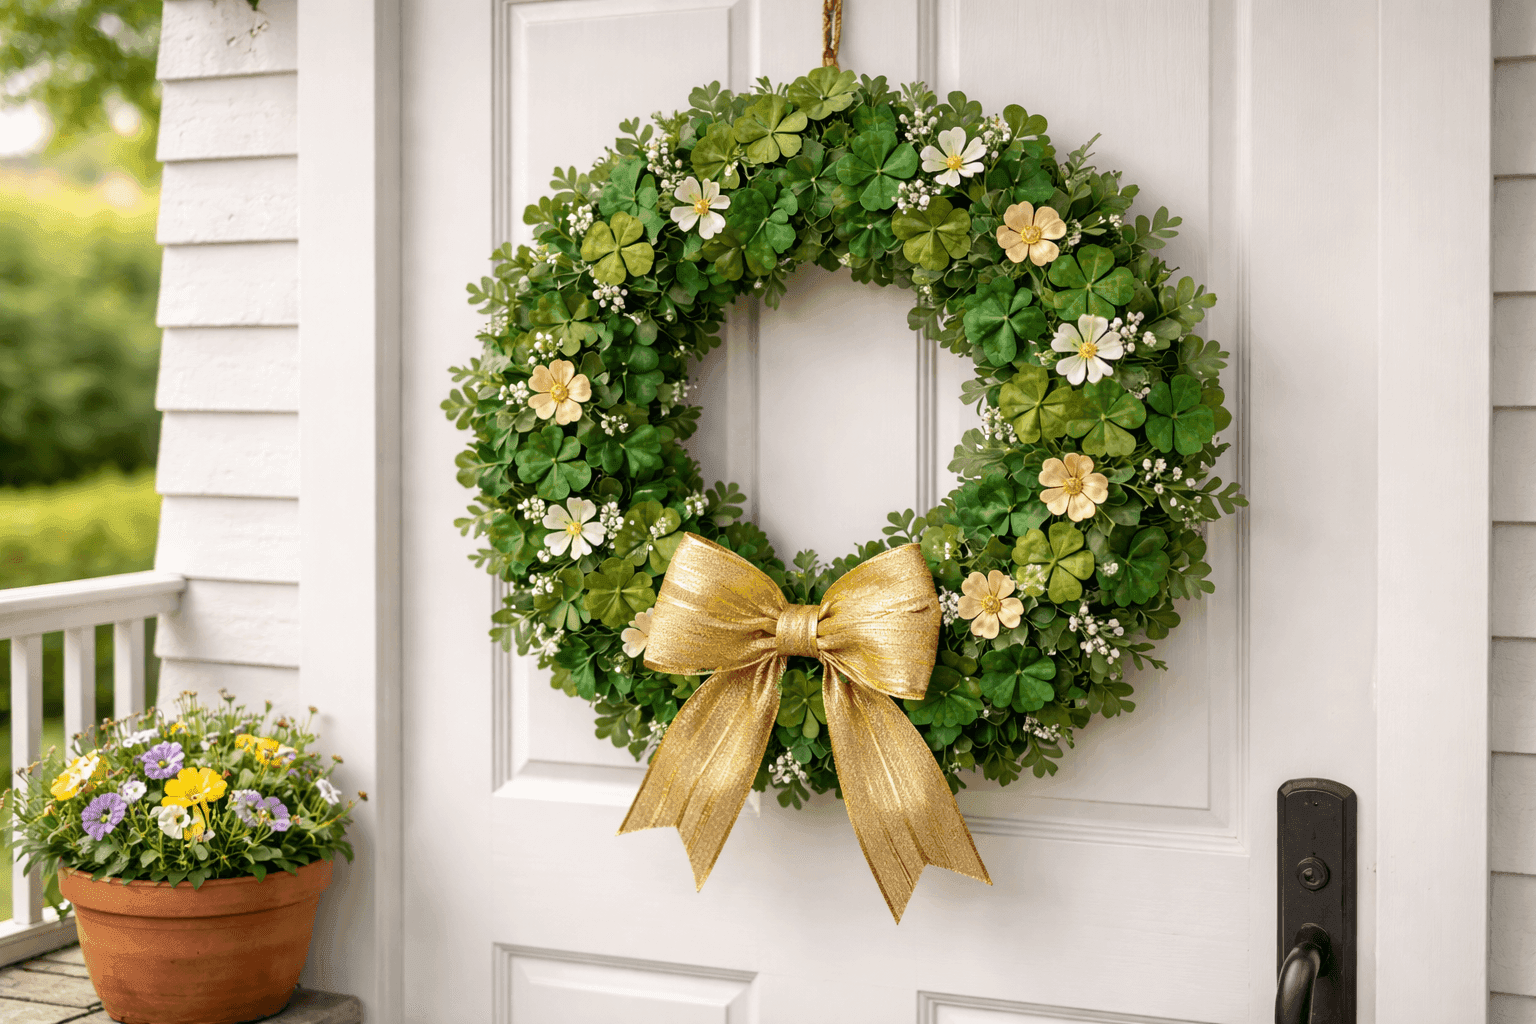
St. Patrick's Day wreaths at home décor stores follow a reliable pattern: they look great, they cost $30 or more, and they'll be on clearance for $8 the week after the holiday when it's too late to enjoy them. The version you make yourself in 30 minutes from dollar store supplies costs $5–7, goes up whenever you want it, and — if you commit to the one principle that separates a lush wreath from a sparse one — looks genuinely indistinguishable from the store version hanging next to you in the checkout line last March. That principle is fullness: wrap the foam base completely so not a single white gap shows through, then glue shamrocks and greenery in overlapping layers until the whole wreath reads as dense and intentional rather than decorated. A well-made green wreath with a gold bow is a genuinely charming front door moment that celebrates Irish heritage without the seasonal home décor markup, and it takes less time to build than it takes to drive to the store and find a parking spot.
What You'll Need
- The Base
- Foam wreath form, 10–12 inches — the most beginner-friendly base; shamrocks and ribbon glue directly onto foam without any preparation (~$1 at dollar stores)
- Wire wreath form as an alternative — allows you to tuck and wire in greenery for a more naturalistic look, though it takes slightly longer to cover fully (~$1–2)
- The Covering
- Green satin or wired ribbon, 1.5-inch wide — the most efficient way to cover a foam form completely; a 9-foot roll covers a standard 10-inch form with enough overlap to eliminate every white gap (~$1 at dollar stores)
- Green yarn as an alternative covering — wraps tightly for a cozy, textured base that reads slightly more rustic and handmade than ribbon, which can be exactly the right aesthetic for a casual seasonal wreath (~$1)
- The Greenery and Shamrocks
- 2–3 bunches of artificial shamrocks — dollar store seasonal sections stock these reliably in the weeks before St. Patrick's Day; buy more than you think you need since fullness requires generous coverage (~$1 per bunch)
- 1–2 bunches of small artificial green flowers or leaf sprigs as filler between shamrocks — adds depth and variety to the surface texture without requiring any additional technique (~$1 per bunch)
- Small white or cream artificial flowers for contrast — a handful of white blooms tucked between the green elements lifts the whole composition and prevents it from reading as a flat single-color mass (~$1)
- Accents and Finishing
- Wired gold or green ribbon for the bow — wired ribbon holds its bow shape without collapsing, which non-wired ribbon cannot; a pre-made bow from the dollar store seasonal section is a perfectly valid shortcut (~$1–2)
- Optional: small "Lucky" wooden sign, mini leprechaun hat pick, or a scatter of gold coin craft embellishments for a more festive, fully themed result (~$1 each)
- Floral wire or a pipe cleaner for attaching a hanging loop to the back
- Tools
- Hot glue gun and glue sticks — the full-size gun holds heat better and gives more working time than a mini gun for a project this size
- Sharp scissors for trimming stems to length
- Total Cost
- $5–7 for a fully finished wreath — compared to $30 or more for comparable store-bought St. Patrick's Day wreaths
How to Make It
- Gather all supplies and lay them out before heating the glue gun — trim shamrock bunches from their stems, separate greenery into individual sprigs, and have your ribbon, scissors, and optional accents within arm's reach. Working with wet glue while hunting for supplies is how you end up with strings of dried glue threading across your finished wreath and a slightly chaotic result.
- Wrap the foam form completely with ribbon or yarn before any greenery goes on — apply a dot of hot glue to secure the ribbon end at a starting point on the inner edge, then wrap in tight, slightly overlapping spirals around the full form until every white surface is covered, finishing with another glue dot to secure the end. Hold the finished base up and rotate it — if any white foam is visible from any angle, wrap that section again before moving on. The base coverage is what gives the finished wreath its polished foundation.
- Establish anchor clusters before filling — glue a cluster of three or four shamrocks at the 12 o'clock, 4 o'clock, and 8 o'clock positions as visual anchor points spaced evenly around the form. These anchor clusters set the scale and density standard for everything that follows and prevent the common mistake of starting densely in one area and running out of material before completing the full circle.
- Fill between anchors by working one section at a time — apply hot glue to the stem end of each shamrock sprig and press firmly against the ribbon base for five seconds, angling each piece slightly outward from the form rather than flat against it to create depth and dimension. Overlap each new addition slightly over the previous one so stems disappear under leaves rather than remaining visible as bare wire sticking out from the surface.
- Tuck in filler greenery and white flowers as you go — small leaf sprigs glued between shamrock clusters fill gaps without requiring more shamrocks, and the occasional white flower tucked into the green creates the contrast that makes each individual element more visible. Step back every few additions and view the wreath from arm's length — gaps are far more visible from a distance than they are up close, and catching them early is easier than retrofitting coverage after the fact.
- Make or attach the bow at the 6 o'clock position — for a wired ribbon bow, cut a 24-inch length, pinch the center into a figure-eight loop, wrap a short piece of wire tightly around the pinch, and fluff the loops outward. For a pre-made bow, simply hot glue it directly to the wreath face. The bow position at the bottom reads as more formal and balanced; at the top it reads as more casual and charming — either works, and both are correct.
- Add optional accents last — a small "Lucky" sign, a leprechaun hat pick, or a scatter of gold coin embellishments glued among the greenery adds the finishing festive layer that tips the wreath from seasonal decoration into a fully committed St. Patrick's Day statement. Attach a floral wire or pipe cleaner loop to the back of the wreath at the 12 o'clock position for hanging, and step back for a final check from across the room before declaring it done.
Floral designers who make seasonal wreaths professionally almost always vary the green tones rather than using a single flat green throughout — mixing kelly green shamrocks with sage green filler sprigs, forest green ribbon, and a few lime green accent pieces creates a layered, dimensional color story that reads as lush and naturalistic rather than flat and craft-store. Real foliage in nature contains dozens of green tones, and mimicking that variety even with artificial materials is what makes a wreath look like it was designed rather than assembled. A simple rule: aim for at least three distinct shades of green across your total materials, and the whole composition will have a depth and richness that a single-green approach simply cannot achieve.


