


More Is More: Build an Outrageously Bold Ornament Chandelier
Embrace joyful excess with statement decor that refuses to apologize
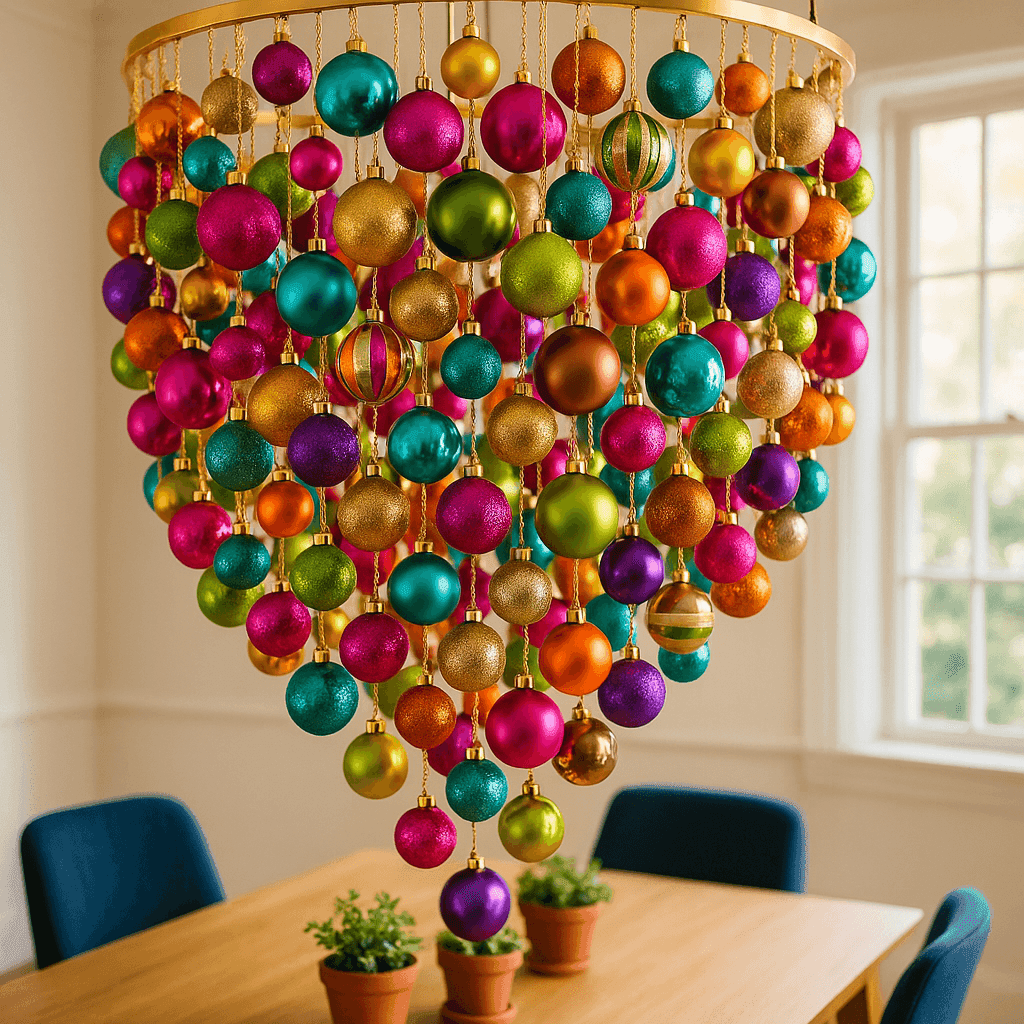
If your decorating philosophy lives by the "more is more" mantra and you believe subtle is just another word for boring, this maximalist ornament chandelier is about to become your holiday masterpiece—a cascading explosion of color, glitter, and unrestrained joy that hangs over your dining table or in a picture window announcing to everyone that you don't do tasteful restraint when celebration is called for. This project costs around $40-70 depending on how outrageously you commit to the excess, takes about 2-3 hours to assemble as you layer ornaments at varying heights, and creates statement decor that literally stops people in their tracks because they've never seen anything quite like this deliberate rejection of coordination in favor of pure visual abundance. The key to success is abandoning all rules about matching—hot pink with gold, turquoise with silver, lime green with bronze, throw in some glitter, add stripes, include solids, mix every finish imaginable until you've created a spinning mobile that catches light from every angle and looks different every time you walk past it. This isn't decor for people who whisper their style; this is for decorators who understand that holidays are about joy, excess, permission to be ridiculous, and creating moments of pure delight through embracing MORE rather than editing down to safe, coordinated good taste that never makes anyone's heart skip a beat.
What You'll Need
- Structure Foundation:
- Large embroidery hoop (18-24"), hula hoop, or wire wreath form ($10-20)
- Choose size based on hanging location and desired drama
- Sturdy construction to support ornament weight
- Consider painting frame to complement or contrast ornaments
- Ornament Collection (40-60+ pieces):
- Shatterproof ornaments in wild color mix ($25-50)
- Hot pink, turquoise, lime green, orange, purple—all the colors!
- Mix metallic gold, silver, bronze, copper finishes
- Include glitter, matte, shiny, striped varieties
- Sizes from 1-4 inches for dimensional variety
- More is genuinely more in this project
- Hanging Materials:
- Clear fishing line or invisible thread (50-100 yards)
- Scissors for cutting line to varying lengths
- Strong ceiling hook for hanging chandelier ($3-5)
- Swivel hook allows spinning (optional but recommended)
- Optional Amplification:
- LED fairy lights woven through structure
- Crystals or beads for extra sparkle
- Ribbon curls in coordinating chaos
- Feathers, tassels, or other excessive touches
Assembly Steps
- Install a sturdy ceiling hook where you want maximum visual impact—over the dining table, in a picture window visible from outside, or any location where the chandelier can spin freely without hitting walls or furniture.
- Attach 4-6 main support lines of fishing line to your hoop frame at evenly-spaced points around the circle, bringing them together above to tie onto your ceiling hook, creating stable suspension that hangs level when weighted with ornaments.
- Cut fishing line into wildly varying lengths from 12 inches to 36 inches—don't measure precisely or create patterns, the randomness is what creates that cascading mobile effect rather than structured tiers.
- Tie fishing line through ornament tops and attach to various points around the hoop frame, working around the circle and varying lengths constantly so ornaments hang at dramatically different heights creating depth and dimension.
- Layer ornaments densely rather than sparsely—this is a chandelier, not a mobile, so pack ornaments close enough that they create visual abundance while still allowing each piece to move independently and catch light.
- Mix colors and finishes with gleeful abandon—put hot pink next to turquoise, follow gold with lime green, add a glitter ball beside a matte stripe, creating color chaos that somehow works because you committed fully to the excess.
- Vary ornament sizes throughout the display rather than grouping by size, which creates more interesting visual texture and ensures no area of the chandelier feels uniform or predictable in any way.
- Fill empty spaces by adding more ornaments wherever you can see through the chandelier too easily—the goal is lush abundance where light filters through moving ornaments rather than obvious gaps that feel sparse or incomplete.
- Test the rotation by giving the chandelier a gentle spin, ensuring it moves freely and nothing tangles, adjusting line lengths if ornaments clump together or preventing the magical mobile effect this piece needs.
- Add finishing touches like LED fairy lights woven through the structure, crystals dangling between ornaments, or literally anything else that makes it MORE because with maximalist decor, you cannot go too far—you can only not go far enough.
Professional maximalists know the secret to excessive decor that works rather than overwhelming: choose one unifying element among the chaos—in this case, all shiny metallic finishes despite the color insanity, or all matte surfaces in wild colors, or mixing only warm metallics (gold, bronze, copper) with jewel tones. The hanging height that creates maximum drama: suspend chandeliers low enough that you walk slightly under them (leaving safe clearance), which puts ornaments at eye level where you experience the color explosion intimately rather than observing from a distance where visual impact diminishes. For dining table placement, hang chandeliers 30-36 inches above the table surface, creating a focal point that guests see at eye level when seated but doesn't block conversation sight lines or interfere with serving dishes being passed. The color theory that makes chaos cohesive: despite mixing every color imaginable, exclude one or two colors completely—for instance, no red or traditional green—which gives your wild palette an intentional quality rather than looking like you bought every clearance ornament without any plan. Consider the light source when positioning your chandelier: near windows where natural light streams through creates different effects than under overhead lighting, and positioning where light comes from multiple angles maximizes the spinning, catching, reflecting magic that makes this piece special. Store maximalist chandeliers by carefully wrapping the entire assembled piece in bubble wrap rather than disassembling, which preserves your investment of time spent getting ornament placement just right and makes next year's decorating a simple hanging job rather than rebuilding from scratch. The courage element that determines success: maximalist decor requires commitment and confidence—if you start second-guessing halfway through and pull back toward "tasteful," you end up with neither maximalism nor coordination, just confused excess that apologizes for itself, which is worse than playing it safe or going fully bold. Remember that this style isn't for everyone, and that's perfectly fine—if guests raise eyebrows or subtly suggest "wow, that's...a lot," take it as the highest compliment because you successfully created decor that refuses to blend into background neutrality and instead announces proudly that holidays are for JOY, EXCESS, SPARKLE, and absolutely zero apologies for being EXTRA in the best possible way.


