Rustic Glow: Craft Wooden Candle Holders for Holiday Tables
Transform simple wood into warm centerpieces that elevate every gathering
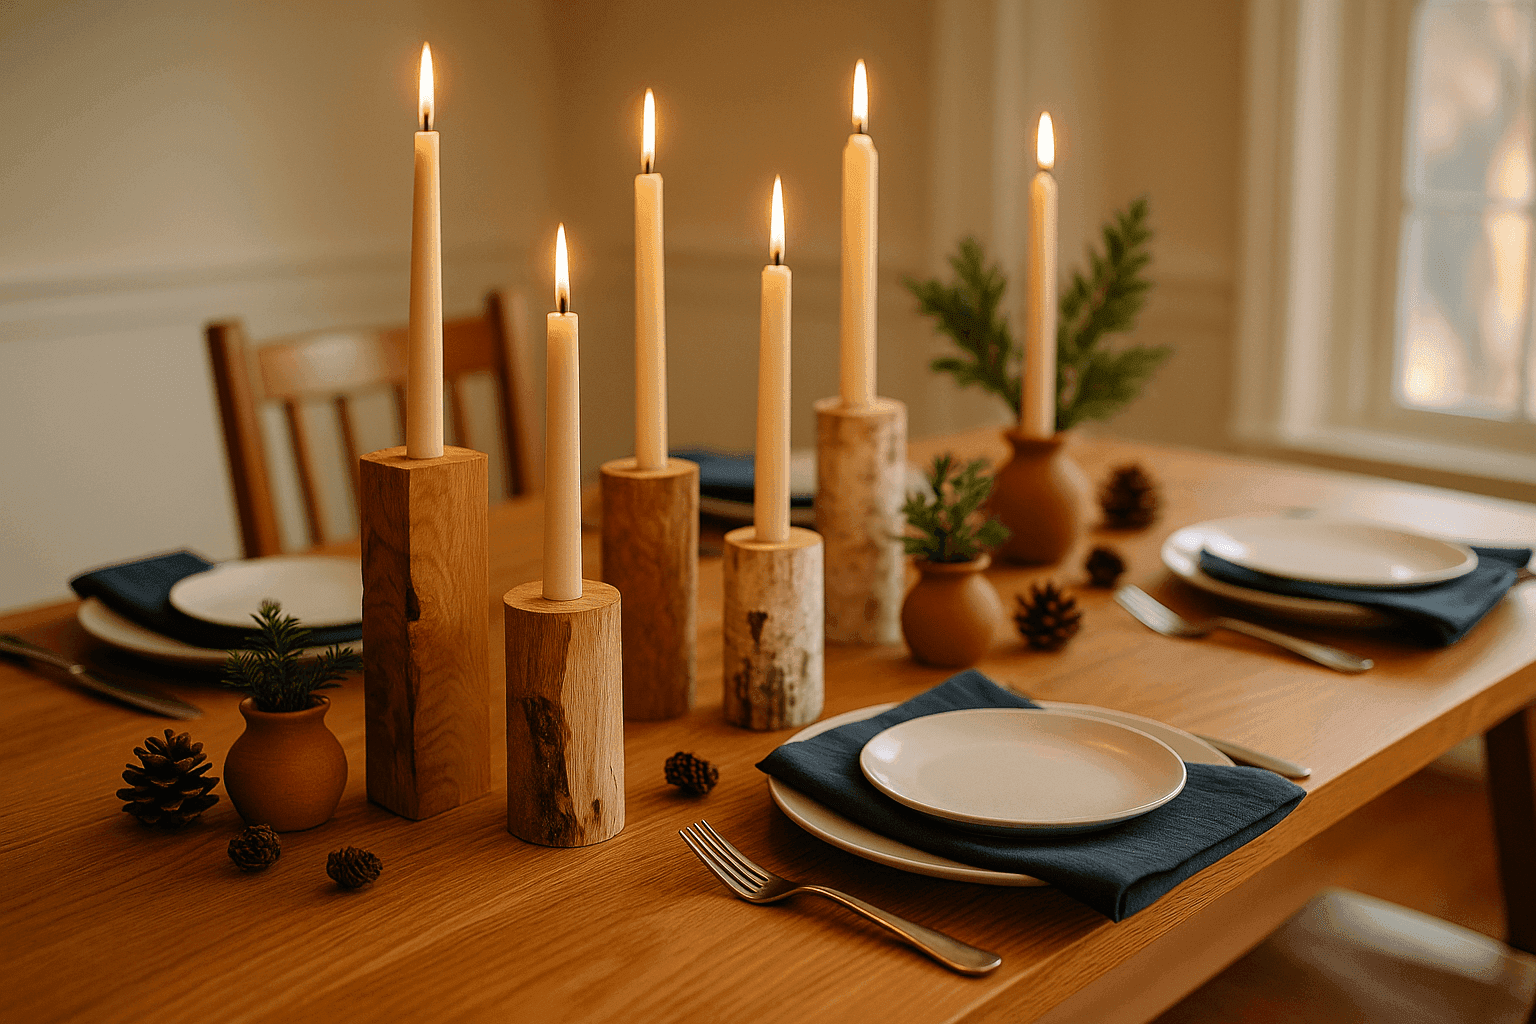
There's something incredibly satisfying about setting a holiday table with candle holders you made yourself from actual pieces of wood—the natural grain patterns, the organic shapes, the way flickering candlelight catches the texture and creates that warm, gathered-around-the-fire atmosphere that makes dinners feel special. These simple wooden candle holders take the basic concept of drilling a hole in wood and turn it into rustic elegance that works equally well for casual family dinners or formal holiday entertaining. This project costs around $15-25 if you're purchasing wood, or essentially free if you're using fallen branches or leftover lumber from other projects, and takes about an hour to create a complete set of varied heights. The beauty is in the imperfection—knots, bark edges, and natural irregularities aren't flaws to hide but character features that make each piece unique and impossible to replicate. Whether you're creating a long centerpiece runner of mixed heights or making individual holders to scatter down the table, these handmade pieces add organic warmth that store-bought holders simply can't match, and they become heirlooms you'll pull out year after year.
What You'll Need
- Wood Materials:
- Wood blocks or log sections, 3-6 inches diameter ($15-25 or free if foraged)
- Mix of heights from 2-8 inches for visual interest
- Choose hardwoods like oak, maple, or birch for durability
- Ensure wood is completely dry to prevent cracking
- Drilling Tools:
- Drill with power cord or charged battery
- Spade bit or Forstner bit sized for taper candles (typically 7/8")
- Measuring tape and pencil for marking
- Clamp to secure wood while drilling
- Finishing Supplies:
- Sandpaper (120 and 220 grit)
- Food-safe mineral oil or beeswax finish ($6-10)
- Clean rags for applying finish
- Wire brush for bark texture (optional)
- Safety Essentials:
- Safety glasses for eye protection
- Work gloves for handling rough wood
- Stable work surface or workbench
Building Steps
- Select your wood pieces, looking for interesting grain patterns, natural bark edges, or unique characteristics that will make each holder special—imperfections are features in rustic design.
- Check that each piece sits stable on a flat surface by testing wobble, trimming the bottom slightly with a saw if needed to create a level base that won't tip when candles are inserted.
- Mark the center point on top of each piece using a pencil, eyeballing the center for organic pieces or measuring precisely for uniform blocks—both approaches work depending on your aesthetic preference.
- Secure your wood piece firmly with a clamp to your work surface, ensuring it won't shift or spin when the drill bit engages, which is critical for both safety and creating clean holes.
- Drill straight down at your marked center point, going slowly and steadily to a depth of 1-1.5 inches, which holds candles securely without drilling so deep you weaken the structure or risk going through the bottom.
- Test-fit a taper candle in each drilled hole, adjusting depth or diameter if needed by drilling slightly deeper or wider until candles sit snugly without excessive force required to insert them.
- Sand the top surface and hole edges smooth with 120-grit followed by 220-grit sandpaper, removing any rough splinters while preserving the natural wood character and texture that makes these pieces special.
- Finish with food-safe mineral oil or beeswax, applying thin coats with a clean rag and letting it soak in for 20 minutes before buffing, which brings out the wood grain while protecting against moisture from table settings.
Professional woodworkers create more dramatic centerpieces by intentionally varying heights—try a cluster of three holders at 3", 5", and 7" tall, or create a long table runner effect with alternating tall and short holders down the center. For extra stability and a finished look, attach felt pads to the bottom of each holder, which protects your table surface while preventing the holders from sliding when guests bump the table. If you're working with logs that still have bark, use a wire brush to remove any loose pieces before finishing, but leave tight bark intact for that authentic woodland aesthetic that brings the outdoors inside. Consider drilling multiple holes in larger wood pieces to create candelabra-style holders with 3-5 candles, which multiplies the dramatic lighting effect while using fewer wood pieces. The ultimate styling trick is mixing your handmade holders with natural elements like scattered pinecones, fresh greenery sprigs, or small seasonal gourds, creating a complete tablescape that feels collected and organic rather than matchy-matchy. Remember that these holders improve with age—wax drips, small dings, and patina from repeated use add to their character and tell the story of gatherings past.