DIY Projects

Recent Content

Space Savers: Make Your Own Seed Tape for $5

Space Savers: Make Your Own Seed Tape for $5

Flour paste + toilet paper + tiny seeds = perfectly spaced rows with zero thinning. Make a full season of seed tape in 30 minutes for under $5.

Rise Up: Build a Garden Trellis Arch This Weekend

Rise Up: Build a Garden Trellis Arch This Weekend

Stop growing flat when you could grow up. A handbuilt trellis arch doubles your garden space, supports serious vine crops, and looks stunning all season.

Stand Tall: Build a Wooden Plant Stand for $10

Stand Tall: Build a Wooden Plant Stand for $10

Four legs + a few cross braces + 90 minutes = a minimalist plant stand that looks $60 and costs $10 to build. Make three at different heights and go.

Steeped in Green: Succulents in a Vintage Teacup

Steeped in Green: Succulents in a Vintage Teacup

A thrifted teacup, a handful of gravel, and one tiny succulent — the desk décor that looks precious, costs under $15, and barely needs watering.

Counter Culture: Turn a Dresser into a Kitchen Island

Counter Culture: Turn a Dresser into a Kitchen Island

A thrifted dresser + butcher block top + locking casters = a custom kitchen island for $60–$100. Skip the $400 store version and build character instead.

Sweet Sips: Create Gift-Worthy Hot Cocoa Spoons for $8

Transform simple spoons into delicious gifts in just 20 minutes

Beautiful chocolate-dipped spoons with colorful sprinkles arranged on parchment paper with mugs of hot cocoa nearby
DIY PROJECTS

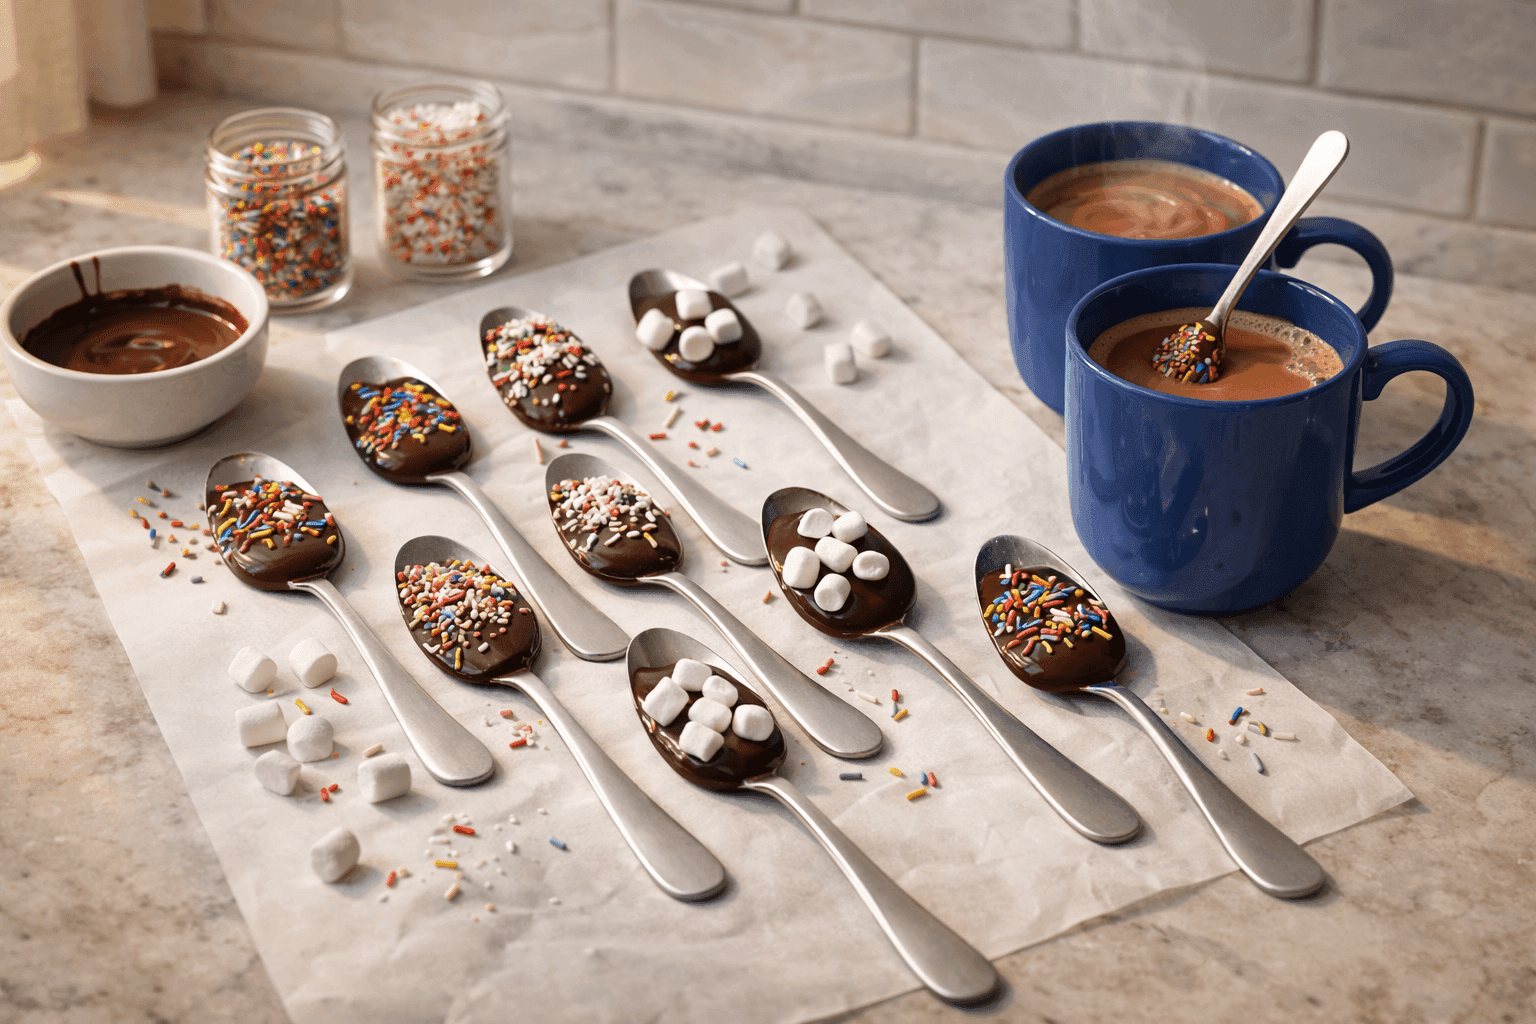
There's something undeniably charming about watching chocolate melt into warm milk as you stir, transforming an ordinary cup of cocoa into a small moment of indulgence. Chocolate-dipped cocoa spoons turn this simple pleasure into a gift-worthy creation that costs about 50 cents per spoon but looks and feels like something from an expensive boutique. While fancy cocoa kits at specialty stores charge $15-20 for three spoons, you can create a dozen beautiful ones in just twenty minutes for under $8 in materials. The magic is in the details—quality chocolate that melts smoothly, colorful sprinkles or crushed candy canes that add visual appeal, and pretty packaging that makes recipients feel genuinely special. These spoons work equally well as Valentine's gifts, teacher appreciation presents, holiday stocking stuffers, or just-because treats for yourself when you need that extra bit of sweetness in your day. The melted chocolate coating dissolves completely into hot milk, creating perfectly sweetened cocoa without needing additional sugar or powder, while the decorated spoon itself becomes a keepsake long after the chocolate disappears. This is one of those rare projects where minimal effort produces maximum wow factor, making it perfect for crafting with kids or batch-producing thoughtful gifts that won't drain your budget.

What You'll Need

  • Spoon Foundation ($3-4):
    • 12 wooden spoons or metal teaspoons from dollar store
    • Stainless steel spoons work beautifully and wash for reuse
    • Wooden spoons create rustic charm but are single-use
  • Chocolate ($3-4):
    • 8-10 oz quality chocolate chips or melting wafers
    • Semi-sweet, dark, milk chocolate, or white chocolate
    • Candy melts in colors for variety (red, pink for Valentine's)
  • Decorative Toppings ($1-2):
    • Colorful sprinkles or nonpareils
    • Crushed candy canes or peppermint candies
    • Mini marshmallows pressed into wet chocolate
    • Crushed cookies, toffee bits, or sea salt
  • Supplies:
    • Microwave-safe bowl for melting chocolate
    • Parchment paper or wax paper
    • Optional: cellophane bags and ribbon for gifting

Create Your Spoons

  1. Prepare your workspace by laying parchment paper on a baking sheet or flat surface, arranging spoons within easy reach—efficient setup prevents chocolate from hardening mid-project when you're searching for supplies.
  2. Melt chocolate in a microwave-safe bowl using 30-second intervals, stirring between each burst until completely smooth and fluid—overheating creates grainy texture that won't coat spoons properly or taste good.
  3. Dip each spoon bowl completely into melted chocolate, covering the entire spoon surface while leaving the handle clean for gripping—work quickly before chocolate begins setting in your bowl.
  4. Tap the spoon gently against the bowl's edge to remove excess chocolate, creating an even coating without heavy drips that make spoons look messy rather than professionally crafted.
  5. Place dipped spoons immediately on parchment paper and add your decorative toppings while chocolate is still wet and tacky—once it sets, toppings won't stick properly no matter how much you press.
  6. Sprinkle your chosen decorations generously over the wet chocolate, working quickly across all spoons before the chocolate coating begins to harden and lose its adhesive quality.
  7. Refrigerate finished spoons for 10-15 minutes to set the chocolate completely, which creates that satisfying snap when they're stirred into hot milk rather than slowly melting into gooey mess.
  8. Package cooled spoons individually in cellophane bags tied with ribbon for gift-giving, or store in airtight containers with parchment between layers if making ahead for future use or enjoyment.
DESIGNER TIP

Professional chocolatiers know that tempering chocolate creates that perfect snap and glossy finish, but for these quick gift spoons, using candy melts or chocolate chips with a touch of coconut oil (1 teaspoon per cup of chocolate) achieves similar results without complicated temperature monitoring. Create themed collections by matching chocolate and topping colors—red and pink candy melts with heart sprinkles for Valentine's, white chocolate with crushed candy canes for Christmas, or orange chocolate with fall-colored sprinkles for autumn gifts. For an elevated presentation, drizzle contrasting chocolate over set spoons (white chocolate over dark, or vice versa) in zigzag patterns that add visual interest. If gifting multiple spoons together, include a small card with usage instructions and your favorite hot cocoa recipe—it transforms a simple gift into a complete cozy experience. Store finished spoons in cool, dry places away from direct sunlight, and they'll keep for 2-3 weeks, though honestly they're usually enjoyed long before then.

Related Content

DIY Projects

01 April 2026

Post

Stand Tall: Build a Wooden Plant Stand for $10

Four legs + a few cross braces + 90 minutes = a minimalist plant stand that looks $60 and costs $10 to build. Make three at different heights and go. ...

DIY Projects

04 April 2026

Post

Set in Stone: Make Handprint Stepping Stones with Kids

A mold, a bag of concrete, and one small hand — the $15 garden project that takes 45 minutes to make and becomes one of your most treasured possessions. ...

DIY Projects

04 April 2026

Post

Mirror, Mirror: Make Disco Ball Planters That Dazzle

Make Disco Ball Planters That Dazzle...

DIY Projects

07 April 2026

Post

For the Birds: Make Homemade Suet Cakes for $10

Lard + peanut butter + seeds + a muffin tin = 12 homemade suet cakes for $10. Make a batch in 20 minutes and watch the birds go absolutely frantic....

DIY Projects

15 April 2026

Post

Hang It Up: Build a Wall-Mounted Herb Drying Rack

Angled dowels + a 1x6 backboard + one hour = a herb drying rack that preserves your harvest and looks great doing it....

DIY Projects

07 May 2026

Post

Paint Meditative Watercolor Plant Portraits for $15

One garden leaf, a brush, and twenty minutes of slow looking — a watercolor botanical practice that costs $15 and lasts all season....

DIY Projects

06 May 2026

Post

Build a Wooden Garden Tool Caddy for $12

One 1×8 board, a jigsaw, and 90 minutes builds the garden caddy that ends the shed round-trip forever — for just $12. ...

DIY Projects

05 May 2026

Post

Make a Paper Flower Garland for Parties for $8

Stack, fold, fluff — fifteen tissue paper blooms strung on jute twine transforms any outdoor space into a party for just $8. ...

DIY Projects

05 May 2026

Post

Make a Tissue Paper Fiesta Banner for Under $5

Stack tissue paper, fold accordion-style, snip a pattern, unfold — twelve fiesta banner panels for under $5 in about an hour....

DIY Projects

04 May 2026

Post

Turn Wooden Crates into Rolling Under-Bed Storage for $12

A wooden crate + four swivel casters + a knotted rope handle = rolling under-bed storage that looks boutique for just $12. ...

DIY Projects

02 May 2026

Post

Sew Lavender Sachets for Drawers & Closets for $8

Tuck dried lavender sachets in every drawer and closet for natural scent and moth protection that lasts all year — whole batch under $8....

DIY Projects

27 April 2026

Post

Turn Thrift Store Frames into Serving Trays for $8

Thrift store frame + two drawer pulls + decorative paper = a boutique-worthy serving tray for $8. Swap the insert anytime. ...

DIY Projects

22 April 2026

Post

Feed the Birds: Build a Platform Bird Feeder for $12

A base board, four corner lips, two posts, and a roof — the $12 platform bird feeder built in 90 minutes that attracts more species than any feeder you can buy....

DIY Projects

21 April 2026

Post

Banner Day: Sew Fabric Bunting Banners for $8

Fabric scraps + pinking shears + ribbon + one straight stitch per flag = a handmade bunting banner for $8 that guests always ask where you bought....

DIY Projects

18 April 2026

Post

Silver Lining: Make Vintage Silverware Wind Chimes

Thrift store silverware + driftwood + an hour = a wind chime that sounds better than boutique versions three times the price....
Terms and ConditionsDo Not Sell or Share My Personal InformationPrivacy PolicyPrivacy NoticeAccessibility NoticeUnsubscribe
Copyright © 2026 DIY HomeBoost