Thrift Store Vases Into Designer Decor for $12
A unified color palette and a few texture techniques turn mismatched finds into a collected, curated display
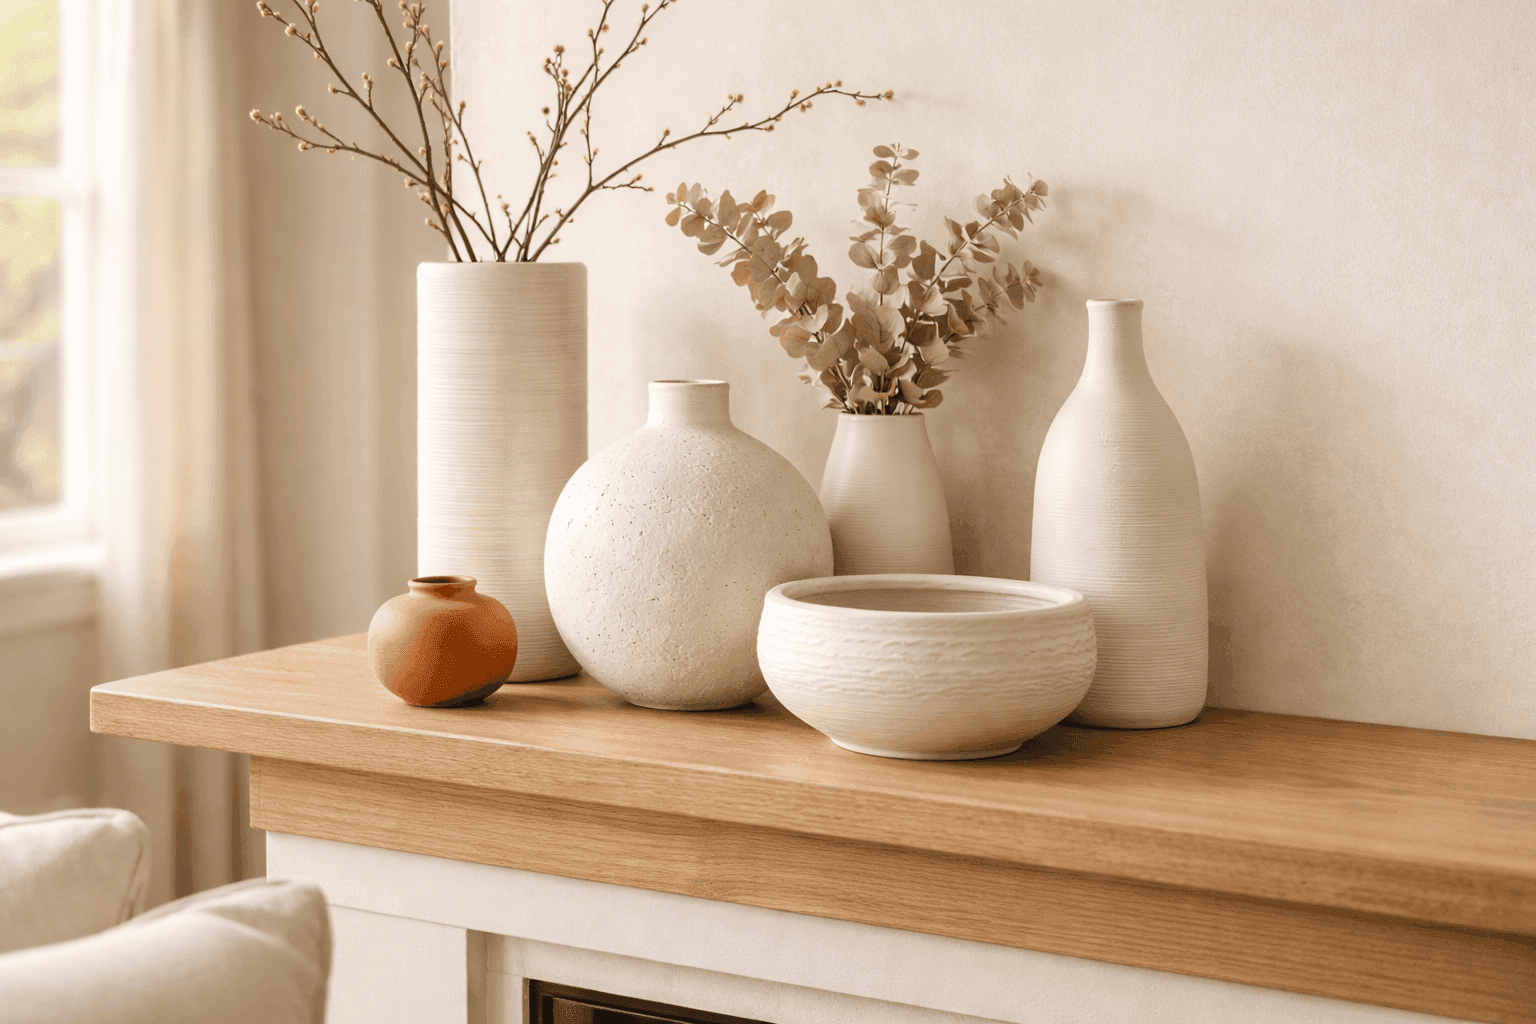
There's a specific kind of designer vase collection — the kind that looks like it was assembled slowly over years of intentional shopping — and the secret is that most of it is just thrift store mismatches tied together by a single consistent color palette and a little texture work. Ceramic, glass, tall, squat, round, angular — none of that matters once every piece is painted the same family of color with a different surface treatment, because suddenly the variety in shape reads as intentional curation rather than random accumulation. The whole collection runs $8–15 in vases and paint, takes an afternoon to complete, and produces the kind of grouped mantel or table display that interior design accounts photograph for months. The textured surfaces catch light in ways that flat-painted pieces simply don't, which is what gives this technique its handcrafted, organic appeal — and what makes people assume it cost significantly more than it did.
What You'll Need
- The Vases
- 3–5 thrift store vases in varied shapes but roughly similar heights — different materials (glass, ceramic, glazed pottery) all work fine once painted; aim for a mix of silhouettes like a tall cylinder, a round bulb, a narrow-necked bottle, and a low wide vessel for the most visually interesting grouping ($0.50–$2 each at most thrift stores)
- Avoid vases with heavy gloss finishes on the exterior without scuff-sanding first — paint won't adhere to a slick glazed surface without prep
- Paint (choose one color family)
- Chalk paint in your chosen palette — chalk paint adheres to almost any surface without primer and dries to a matte finish that takes texture beautifully (~$5–8 for a small sample pot covers 3–5 vases easily)
- Color palette options: all whites and creams for a clean, organic look; sage and olive greens for an earthy botanical feel; terracotta tones ranging from blush to rust for warm seasonal depth — pick one family and stay in it across all five vases
- One or two shades within your chosen family adds subtle variation without breaking the cohesion
- Texture Tools (use what you have)
- Wide-toothed comb or fork — dragged through wet paint creates clean parallel line texture
- Sea sponge or crumpled plastic wrap — dabbed onto wet paint creates organic stippled or crackled surface variation
- Twine or natural fiber string — wrapped around the vase before painting and removed while wet leaves a subtle woven impression
- Palette knife or old butter knife — used to apply modeling paste or thick paint in raised ridges and swipes for dimensional texture
- Modeling paste or texture paste — adds genuine physical dimension to the surface for a sculptural quality (~$4–6 for a small tub)
- Finishing
- Matte sealer spray or clear wax — protects the finished texture and prevents chalk paint from rubbing off on hands (~$5–7)
- Fine-grit sandpaper (220-grit) for scuffing slick surfaces before painting and for lightly distressing edges after
- Total Cost
- $8–15 for vases and paint; add $5–10 if purchasing modeling paste and sealer new
How to Make Them
- Select and clean your vases thoroughly — wash with warm soapy water, remove any price stickers completely, and let them dry fully. Lightly scuff any glossy exterior surfaces with 220-grit sandpaper before painting; chalk paint sticks to most surfaces without this step, but a quick scuff on shiny glazed pieces guarantees adhesion and prevents peeling later.
- Assign a texture technique to each vase before you open any paint — comb lines on the tall cylinder, stippling on the round bulb, string impression on the narrow bottle, palette knife ridges on the low wide vessel, and so on. Deciding this upfront means you're executing a plan rather than improvising on the fly with wet paint drying faster than you'd like.
- Apply the base coat to all vases first using chalk paint and a foam brush, working in smooth strokes from top to bottom. One thin coat is enough for the base — you want coverage, not buildup, since the texture layer comes next and adding too much paint beneath it muddies the detail. Let the base coat dry to the touch, about 20–30 minutes.
- Apply texture while the second coat is still wet — brush on a second layer of paint or a thin spread of modeling paste, then immediately work your chosen tool through it before it begins to set. For comb lines, drag in one continuous motion from top to bottom. For stippling, dab the sponge on and lift straight up rather than wiping sideways. For string texture, wrap tightly before painting and pull the string away cleanly while the paint is still tacky.
- Use the palette knife for any vases getting dimensional texture — scoop a small amount of modeling paste or thick paint onto the knife and apply in confident, varied strokes across the surface. Overlapping layers of different thicknesses create depth that catches light dramatically. Don't overwork it — one or two passes per section preserves the organic quality that makes the technique look artful rather than fussy.
- Let everything dry completely before handling — chalk paint dries quickly on the surface but needs a full hour minimum before it's stable enough to move without smudging fresh texture. If you applied modeling paste, give it at least two to three hours or overnight before sealing, as paste holds moisture longer than paint alone.
- Seal each vase with a light coat of matte sealer spray or clear furniture wax, working in thin even passes and letting it dry fully. This step is what prevents chalk paint from rubbing off when handled and protects any dimensional texture from chipping. A matte finish maintains the handcrafted, organic feel — avoid gloss sealers, which undercut the entire aesthetic of the technique.
- Group and style the finished collection together on a mantel, console table, or shelf — cluster all five close together rather than spacing them out, varying heights naturally within the group. Fill one or two with fresh spring branches, dried stems, or simple greenery and leave the remaining vases empty. A mix of filled and unfilled vessels within the same display gives the grouping visual breathing room without losing impact.
Interior stylists who work with vignette displays almost always follow an odd-number rule for grouped objects — three, five, or seven pieces rather than two, four, or six — because odd groupings create a natural visual hierarchy with a clear focal point rather than a symmetrical lineup the eye moves across and immediately leaves. Within that odd grouping, the arrangement that works best is a loose triangle: tallest piece slightly off-center at the back, two mid-height pieces flanking it at angles, and the smallest pieces tucked in front where they anchor the group without blocking the taller forms behind them. This triangular composition is what separates a styled vignette from a shelf that just has things on it, and it takes about 90 seconds to achieve once you know what you're going for.