


Turn Holiday Cards Into Beautiful Hanging Display Art
Create a charming clothespin garland that transforms greeting cards into festive decor guests actually want to read
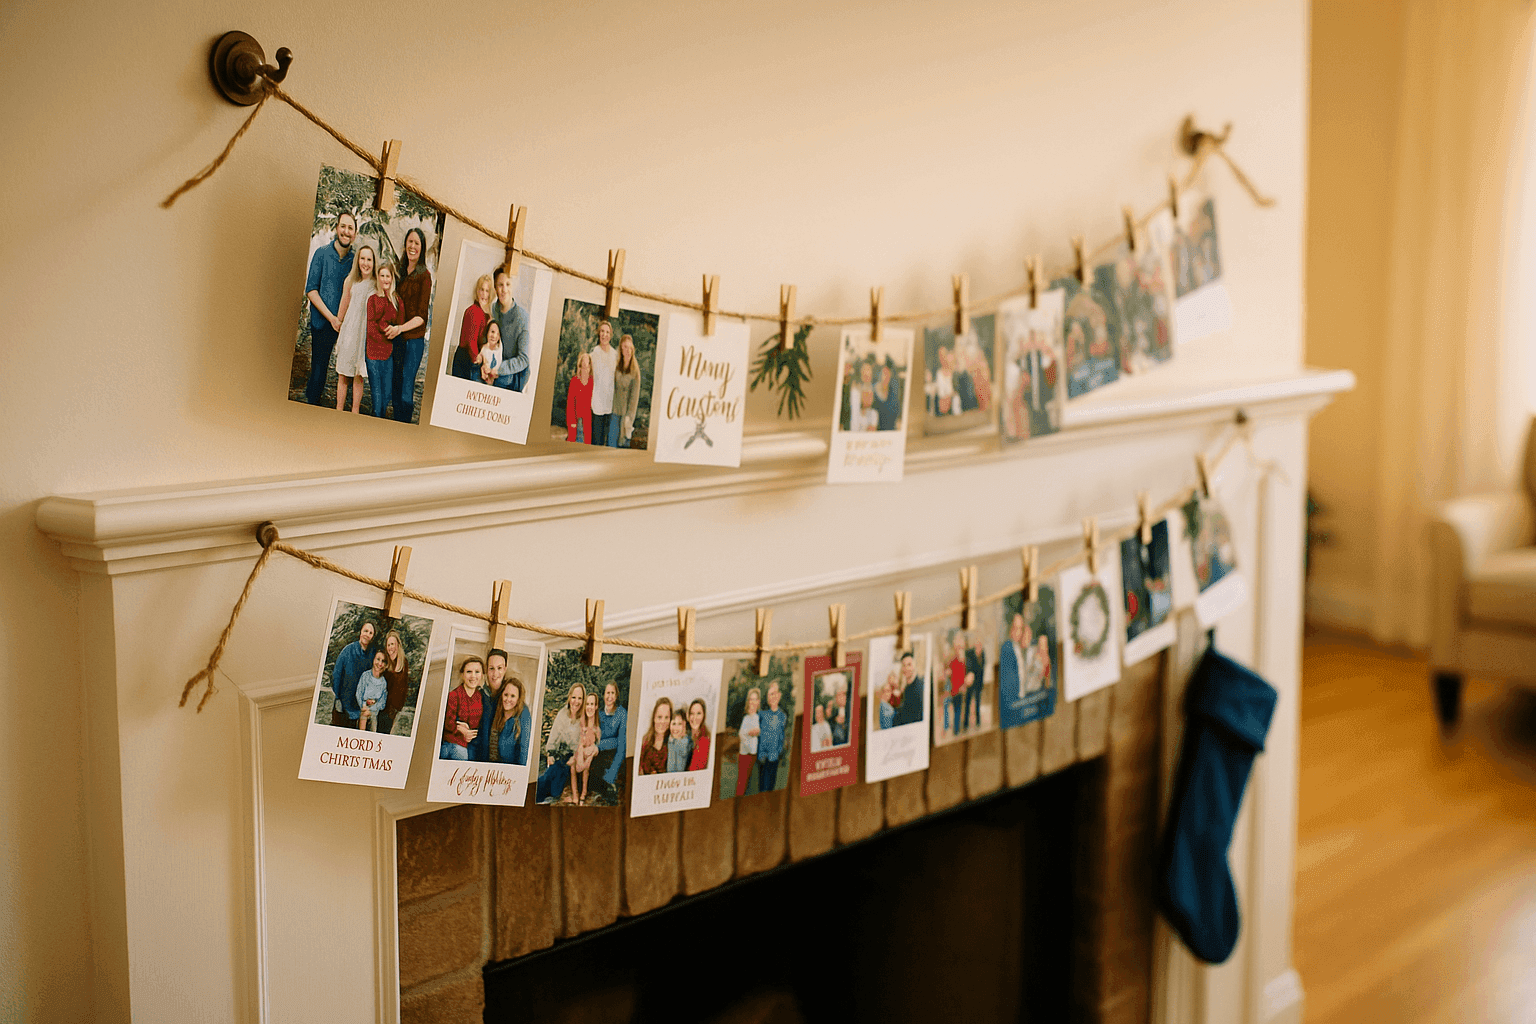
For years I stacked incoming holiday cards in a pile on the kitchen counter where they'd sit unread until I eventually recycled them in January, feeling vaguely guilty about not properly appreciating the thoughtfulness people invested in sending greetings. Creating a clothespin card garland transformed those neglected greetings into living room focal point that guests naturally gravitate toward, reading cards aloud and commenting on photos—suddenly cards became interactive decor rather than forgotten clutter. This simple display costs $8-12 and takes about 20 minutes to install initially, then becomes an evolving decoration that grows more colorful and interesting as cards arrive throughout December. I hang mine across my mantel now, but garlands work beautifully strung along hallways, above doorways, across empty wall spaces, or even zigzagging across entire rooms for dramatic effect. The genius of this system is that it solves multiple problems simultaneously: cards get displayed where people actually see and enjoy them, your decor becomes more personal and meaningful than generic store-bought items, and the garland creates conversation starters as guests recognize friends' families and read heartfelt messages. Beyond December, the basic garland infrastructure stays up year-round in my home—I swap holiday cards for birthday cards, postcards from travels, children's artwork, or inspirational quotes, making it functional home decor rather than single-use seasonal installation.
What You'll Need
- String Base:
- Natural jute twine for rustic farmhouse look
- Or ribbon in coordinating holiday colors
- Baker's twine for vintage aesthetic
- Fishing line for invisible modern approach
- Measure space and add 24 inches for hanging loops
- Clothespins:
- Mini wooden clothespins (1-inch size)
- Plan for one pin every 6-8 inches
- Natural wood or painted to match decor
- Available in bulk at craft stores
- Cost: $3-5 for 50-count package
- Hanging Hardware:
- Command hooks or small nails for mounting
- Choose based on wall type and weight
- Two hooks minimum per garland strand
- Picture hanging hooks for heavy card loads
- Optional Embellishments:
- Fairy lights woven through garland
- Small ornaments between cards
- Evergreen sprigs tucked around pins
- Decorative washi tape on pins
- Small bells or charms
- Assembly Tools:
- Scissors for cutting twine
- Tape measure for spacing
- Pencil for marking hook positions
- Level for straight installation
- Total Cost: $8-15 for complete setup
Creation Steps
- Measure your space by identifying where your garland will hang and measuring the exact length, accounting for natural sag that occurs when cards are added. Mantels, walls above sofas, hallways, and spaces above doorways all work beautifully—choose locations where people naturally gather or pass frequently.
- Cut twine generously by adding 12 inches on each end beyond your measured space for tying to hooks or creating hanging loops. Too-short twine creates frustrating tension and limits adjustment options, while extra length allows flexibility in final positioning and easy retying if needed.
- Install mounting hooks at each end point using Command strips for damage-free hanging or small nails for more permanent installation, positioning them slightly higher than desired garland height to allow for natural droop once cards are added. Use a level to ensure hooks sit at matching heights for symmetrical appearance.
- Attach clothespins to twine before hanging by clipping them onto the string at evenly spaced intervals—every 6-8 inches provides adequate card spacing without looking sparse or crowded. Pre-attaching pins is much easier than trying to clip them onto taut strung twine and creates more consistent spacing.
- String the garland by tying twine securely to each hook with simple knots or loops, allowing slight sag in the middle for natural draping appearance rather than pulling taut like a wire. The gentle swag creates visual softness and makes cards easier to reach for adding and removing.
- Test with cards before declaring finished by clipping several cards along the garland's length to verify weight distribution, spacing aesthetics, and that cards hang at readable height. This test run catches issues like inadequate hook strength or awkward card positioning while they're still easy to fix.
- Add embellishments thoughtfully if desired by weaving fairy lights through the twine for evening glow, tucking small evergreen sprigs between pins, or hanging miniature ornaments alternating with cards. Less is more—embellishments should enhance rather than compete with the cards themselves which are the real stars.
- Create display strategy by deciding whether to arrange cards by sender, chronologically as they arrive, by card design aesthetic, or completely randomly. Some people love the evolving organic look of adding cards as received, while others prefer curated arrangements that create visual patterns.
- Maintain throughout season by adding new cards promptly when they arrive rather than letting them pile up elsewhere, rotating older cards to less prominent positions as new arrivals take center stage. This active curation keeps the display fresh and ensures recent senders see their cards prominently displayed when they visit.
- Preserve after holidays by photographing your full garland as a memory of who sent greetings this year, then storing favorite cards in albums or shadow boxes before recycling the rest. The garland itself can stay up year-round with different content, or dismantle and store pins and twine for reuse next December.


