


Upcycle Wire Hangers Into Custom Wreath Forms for Free
Transform closet clutter into endless seasonal wreath bases that cost nothing
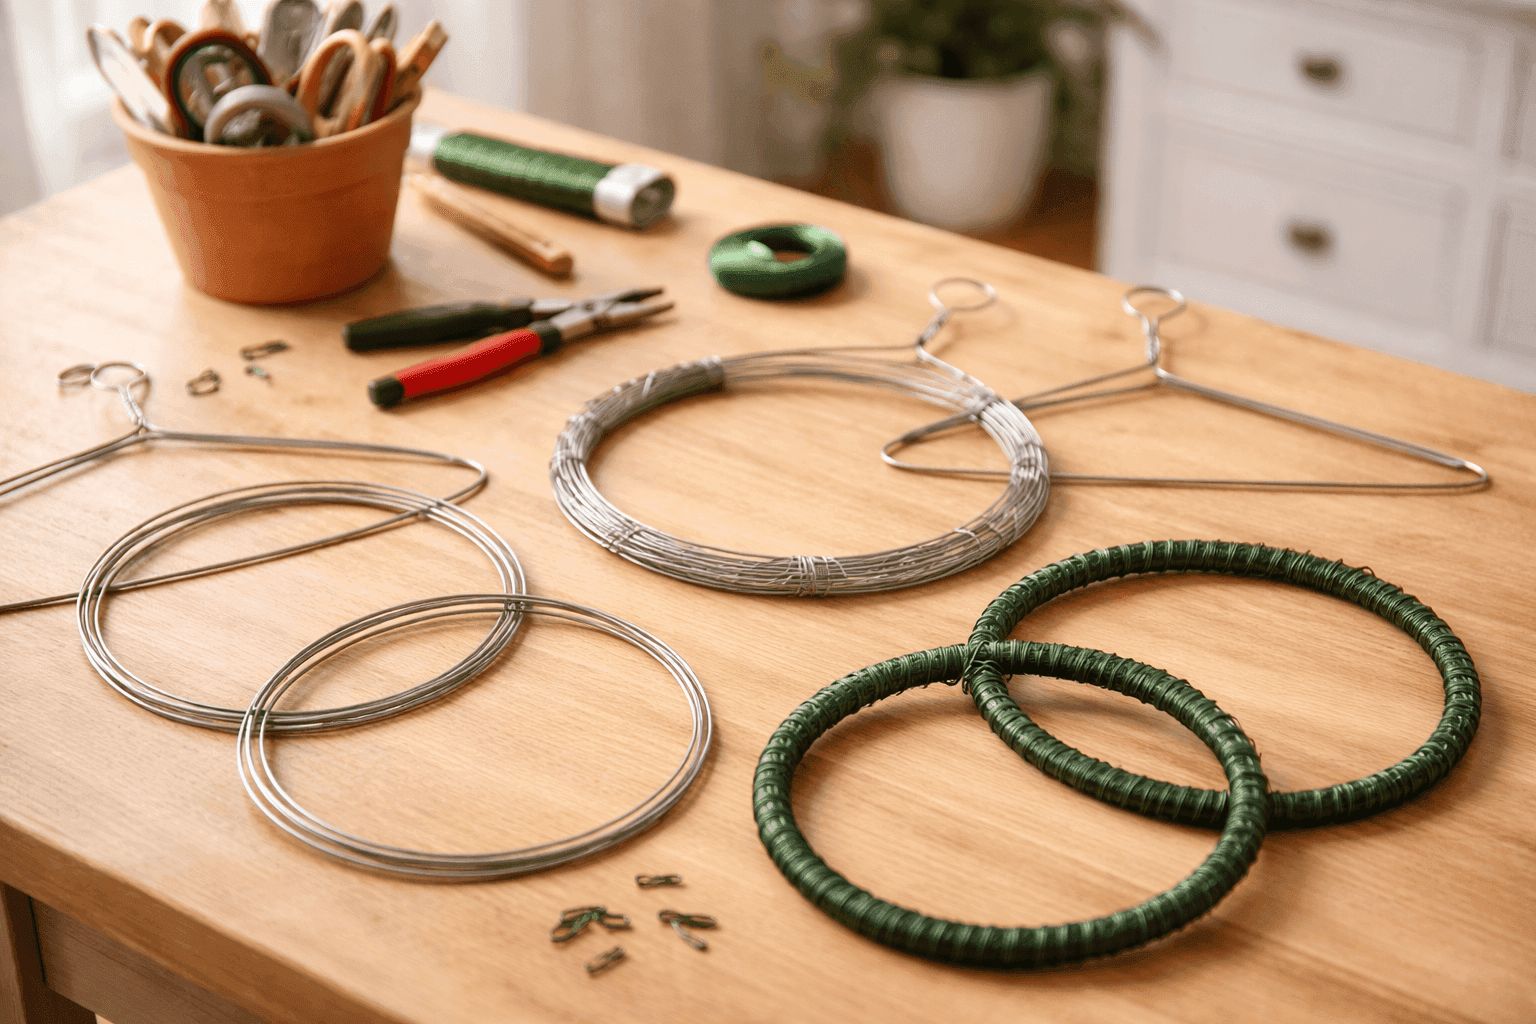
Those wire hangers multiplying in your closet like rabbits—the ones from the dry cleaner that you keep meaning to return—are actually perfect wreath forms just waiting to be bent into shape. Store-bought wreath frames cost $8-15 each, which adds up fast if you like switching out seasonal door decor, but wire hangers transform into custom-sized forms in about ten minutes using supplies you already own. I discovered this hack after realizing I had two dozen wire hangers taking up closet space and was simultaneously shopping online for wreath forms, and honestly, I felt a little ridiculous for not connecting those dots sooner. The wire is strong enough to support heavy decorations, flexible enough to shape easily, and the built-in hook means your finished wreath is ready to hang immediately. You'll spend zero dollars and about ten minutes per form creating wreath bases in any size you want, and suddenly you have permission to make wreaths for every season without the guilt of buying more craft supplies. Think of it as giving purpose to something that was headed for recycling anyway—functional upcycling at its finest.
What You'll Need
- Wire hangers: Standard dry cleaner hangers—as many as you want wreath forms (free from your closet)
- Pliers: Needle-nose pliers for bending and shaping wire (use what you own)
- Wire cutters: For trimming excess wire if needed (often part of your pliers)
- Floral wire or duct tape: For securing overlapped ends and reinforcing structure ($3-5 if you need to buy)
- Work gloves (optional): To protect hands from sharp wire ends
- Round object for shaping (optional): Bucket, pot, or other circular form to help create uniform circles
Step-by-Step Instructions
- Straighten the hanger by pulling and bending it into a single long wire, using pliers to undo the twisted neck section—don't worry about getting it perfectly straight, just relatively linear
- Keep the hook intact by stopping your straightening process about 2-3 inches from the hook portion, which will become your built-in hanging mechanism for the finished wreath
- Form the circle by gently bending the straightened wire around a bucket, large pot, or other circular object that's your desired wreath size—or freehand it if you're confident with your shaping skills
- Overlap the ends by bringing the two wire ends together with about 2-3 inches of overlap, positioning them so they'll be hidden on the back of your wreath when decorated
- Secure the connection by wrapping floral wire tightly around the overlapped section multiple times, or wrapping with duct tape for a quick-and-dirty solution that works perfectly under wreath decorations
- Shape and adjust by gently manipulating the circle to make it as round as possible—it doesn't need to be perfect because decorations will hide minor irregularities
- Reinforce if needed by wrapping additional wire hangers around your base circle for extra-sturdy forms that can support heavy decorations like pinecones or thick greenery
- Add multiple layers for fuller wreaths by creating 2-3 wire hanger circles of slightly different sizes and securing them together with floral wire, building dimension and structure for more elaborate seasonal decorations
Professional wreath makers often prefer wire hanger forms to store-bought versions because you can customize the exact size and create asymmetrical or oval shapes that aren't available commercially. For extra-large statement wreaths, twist two or three wire hangers together before shaping to create a thicker, stronger base that won't warp under heavy decorations. The bare wire form works beautifully for modern minimalist wreaths where you want the structure visible, or wrap the entire circle with floral tape, ribbon, or twine before decorating to hide the wire completely. Create a whole collection of forms in different sizes during one crafting session—small ones for interior doors and cabinet decorations, medium for standard front doors, and oversized for dramatic exterior statements. Wire hanger forms are especially perfect for learning wreath-making because you can experiment freely without worrying about wasting expensive supplies, and if a design doesn't work, just unwrap everything and start over with the same base. For wreaths that need significant structural support like grapevine or evergreen designs, create a double-ring form by nesting one wire circle inside another about two inches smaller and connecting them with perpendicular wire spokes like a wagon wheel. Store your finished forms flat or hanging so they maintain their shape between seasonal decorating projects—they're essentially indestructible and will last for years of repeated use.


