


Upcycle Worn Boots Into Charming Fall Porch Planters
Transform old leather or rain boots into quirky planters perfect for mums and ornamental kale
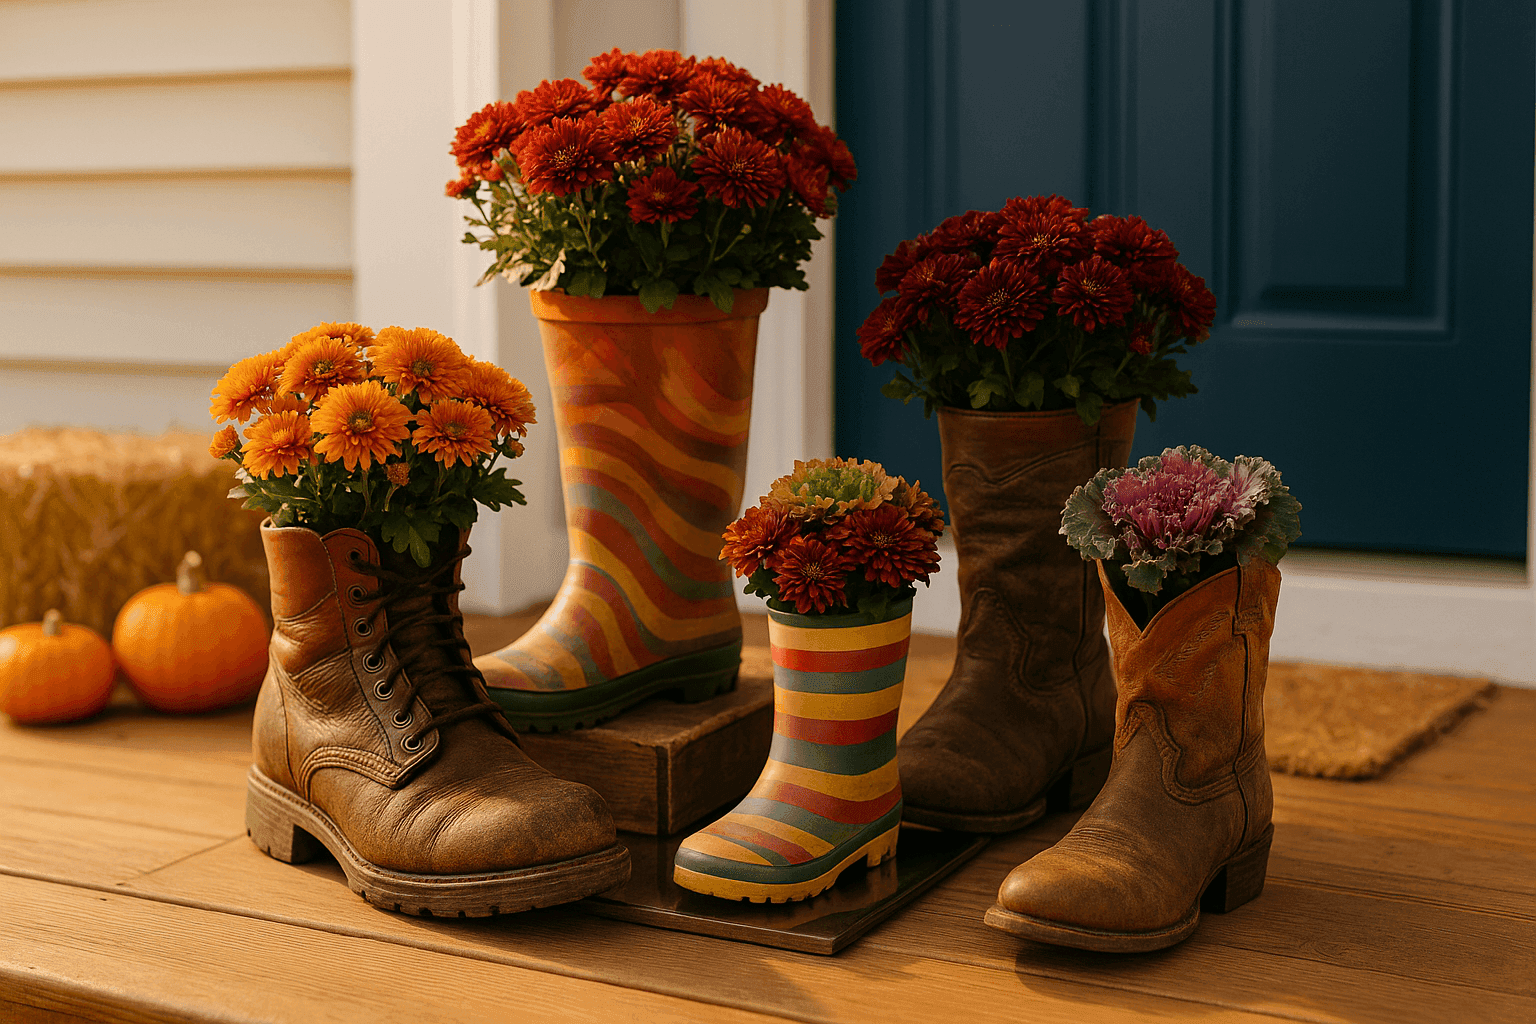
Those old boots sitting in your closet or mudroom—the ones too worn to donate but too sentimental or interesting to throw away—have been waiting for exactly this transformation into quirky conversation-starting planters that add personality and whimsy to fall porch displays. This upcycling project works beautifully with vintage cowboy boots, worn rain boots, old hiking boots, or even outgrown kids' rain boots, turning forgotten footwear into functional containers that hold autumn mums, ornamental cabbage, or trailing succulents with unexpected charm. The conversion process costs practically nothing beyond the plants themselves since you're working with boots you already own, takes about 15 minutes per boot to drill drainage holes and prepare for planting, and creates absolutely unique decorations impossible to replicate because each boot has its own character, wear patterns, and story. What makes boot planters so appealing is how they bridge rustic farmhouse style with playful cottage garden aesthetic—they're simultaneously nostalgic and fresh, practical and decorative, honoring the boot's original purpose of protecting feet outdoors while adapting it to support plant life in that same outdoor environment. The height advantage is significant too, because tall boots naturally elevate plants off the ground creating vertical interest in porch arrangements without needing expensive plant stands or pedestals, making eye-catching displays from ordinary mums that would otherwise sit flat and unremarkable in standard pots.
Planter Conversion Supplies
- Boots to Convert:
- Old leather boots with character and patina (free from closet)
- Worn rubber rain boots in fun colors or patterns
- Vintage cowboy or riding boots from thrift stores ($5-15)
- Kids' outgrown boots for smaller plant displays
- Must be waterproof or leather that tolerates moisture
- Drainage Preparation:
- Power drill with 1/4-inch or 3/8-inch bit ($2-3 if you don't have one)
- Landscape fabric or weed barrier cloth ($5-8 per roll)
- Small rocks or pebbles for drainage layer ($3-5)
- Potting soil appropriate for your chosen plants ($5-8)
- Plants for Boot Planters:
- Fall mums in orange, burgundy, or yellow ($5-10 each)
- Ornamental kale or cabbage for texture ($4-8 each)
- Pansies for cold-hardy color ($3-5 per pack)
- Trailing ivy or creeping jenny for overflow effect ($4-6)
- Optional Enhancements:
- Boot polish or leather conditioner for refreshing appearance ($5-8)
- Waterproof spray for protecting leather from weather ($8-12)
- Decorative ribbon or twine around boot tops ($2-4)
- Wood planks or crates for elevating boot groupings ($5-10)
Boot Planter Conversion
- Clean Boots Thoroughly: Wash boots inside and out with soap and water, removing all dirt, debris, and mildew that accumulated during their footwear life—starting with clean boots prevents soil contamination and gives you a better surface for any conditioning or decorative treatments you want to apply before planting.
- Drill Drainage Holes: Using a power drill with appropriate bit size, create 4-6 drainage holes in the sole of each boot, spacing them evenly across the bottom—proper drainage is absolutely critical because boots without holes become waterlogged swamps that rot plant roots and create mosquito breeding grounds within days of first rain.
- Condition Leather Optional: For leather boots, apply boot polish or leather conditioner to restore color and add protective layer against weather exposure, which helps boots maintain their appearance through fall season rather than deteriorating rapidly when exposed to rain and temperature fluctuations outdoors on your porch.
- Line With Landscape Fabric: Cut landscape fabric to size and line the interior of each boot, tucking it down into the toe and letting it extend about an inch above the boot opening—this fabric allows water drainage while preventing soil from washing out through drainage holes and keeps the boot interior cleaner for easier end-of-season cleanup.
- Add Drainage Layer: Place a 1-2 inch layer of small rocks or pebbles at the bottom of each boot over the landscape fabric, which creates a reservoir that prevents soil from sitting in standing water even after heavy rains—this drainage layer is especially important in tall boots where the soil column is deeper and holds more moisture.
- Fill With Potting Soil: Add quality potting soil (not garden dirt which compacts) until boot is filled to within 2-3 inches of the top, leaving adequate space for your plant's root ball while ensuring the soil line sits below the boot opening so you don't see bare soil disrupting the visual effect of plants emerging from footwear.
- Plant Your Selection: Remove your chosen mum, kale, or other fall plant from its nursery pot, gently loosen the root ball, and nestle it into the prepared boot soil, adding more soil around the edges to fill gaps and firm gently—taller plants work best in tall boots while shorter compact plants suit ankle boots or children's footwear better for proportional display.
- Arrange on Porch: Display your boot planters in groupings of odd numbers (3 or 5) for visual impact, mixing boot heights and styles while placing taller boots toward the back if arranging against a wall—consider pairing boot planters with traditional pots, pumpkins, or hay bales to create complete fall porch vignettes that balance whimsy with seasonal tradition.
Professional garden designers who create high-end container displays recommend the "boot personality matching" concept where you pair specific plant types with boot styles that reinforce particular aesthetic themes. Rugged hiking boots or worn work boots look best with hardy mums in traditional fall colors and ornamental grasses that emphasize their utilitarian history, while colorful rain boots suit playful pansies and trailing ivy that embrace cottage garden whimsy. Vintage cowboy boots demand bold architectural plants like ornamental kale or burgundy fountain grass that match their statement-making presence, and elegant riding boots pair beautifully with sophisticated white or cream mums creating refined autumn arrangements. This intentional pairing makes displays look curated rather than random. The height management trick that prevents tall boots from toppling in wind is filling the bottom third with sand or gravel before adding your drainage rocks and soil—this extra weight low in the boot creates stability that keeps them upright during storms while still allowing drainage through holes you drilled in the sole. For leather boots that you want to preserve as long as possible, apply several coats of waterproof spray after conditioning but before planting, letting each coat dry completely before adding the next. This creates a protective barrier that dramatically extends the boot's outdoor life from one season to multiple years of reuse. Consider creating a themed collection that tells a story—a family boot garden using dad's old work boots, mom's gardening boots, and kids' outgrown rain boots creates a charming narrative display that captures family personality while giving sentimental items continued purpose rather than languishing forgotten in closets or ending up in landfills where perfectly functional items wastefully contribute to environmental problems.


