10-Minute Magic: Transform Your Room With Holiday Pillow Covers
The fastest seasonal refresh that makes guests think you redecorated everything
There's an interior design secret that professionals use constantly but homeowners often overlook: throw pillow covers are the fastest, cheapest way to completely transform a room's entire vibe without moving furniture, painting walls, or spending serious money. Simply swapping your everyday neutral covers for festive holiday versions takes literally 10 minutes—about the time it takes your coffee to brew—yet creates that "wow, you really went all out decorating" impression that makes guests think you spent days preparing. This instant refresh costs just $5-15 per cover at discount stores, requires zero sewing skills thanks to zippered or envelope-back designs, and involves zero commitment since you keep your existing pillow inserts and simply swap the outer covers like changing clothes. The psychological impact is remarkable—rich velvet textures, classic plaids, or shimmering metallics in jewel tones, winter whites, or traditional holiday colors immediately signal "festive gathering space" to everyone who enters, creating that special occasion atmosphere that makes everyday living rooms feel party-ready. Best of all, this isn't a one-season investment; you'll use these covers every December for years, making the per-use cost essentially pennies while the impact remains consistently impressive.
What You'll Need
- Cover Selection:
- Holiday pillow covers matching your insert sizes ($5-15 each)
- Count your existing pillows before shopping
- Choose zippered or envelope-back styles for easy swapping
- Mix textures: velvet, plaid, metallic, faux fur
- Color Schemes:
- Traditional: red, green, gold combinations
- Elegant: jewel tones (emerald, sapphire, ruby)
- Modern: winter whites, silver, icy blue
- Rustic: plaids, buffalo check, natural linen
- Storage Supplies:
- Clear plastic bins for storing everyday covers ($8-12)
- Labels for easy identification
- Tissue paper to prevent wrinkles (optional)
- Optional Enhancements:
- Holiday-themed lumbar pillows for variety
- Decorative pillow brooches or pins
- Coordinating throw blanket
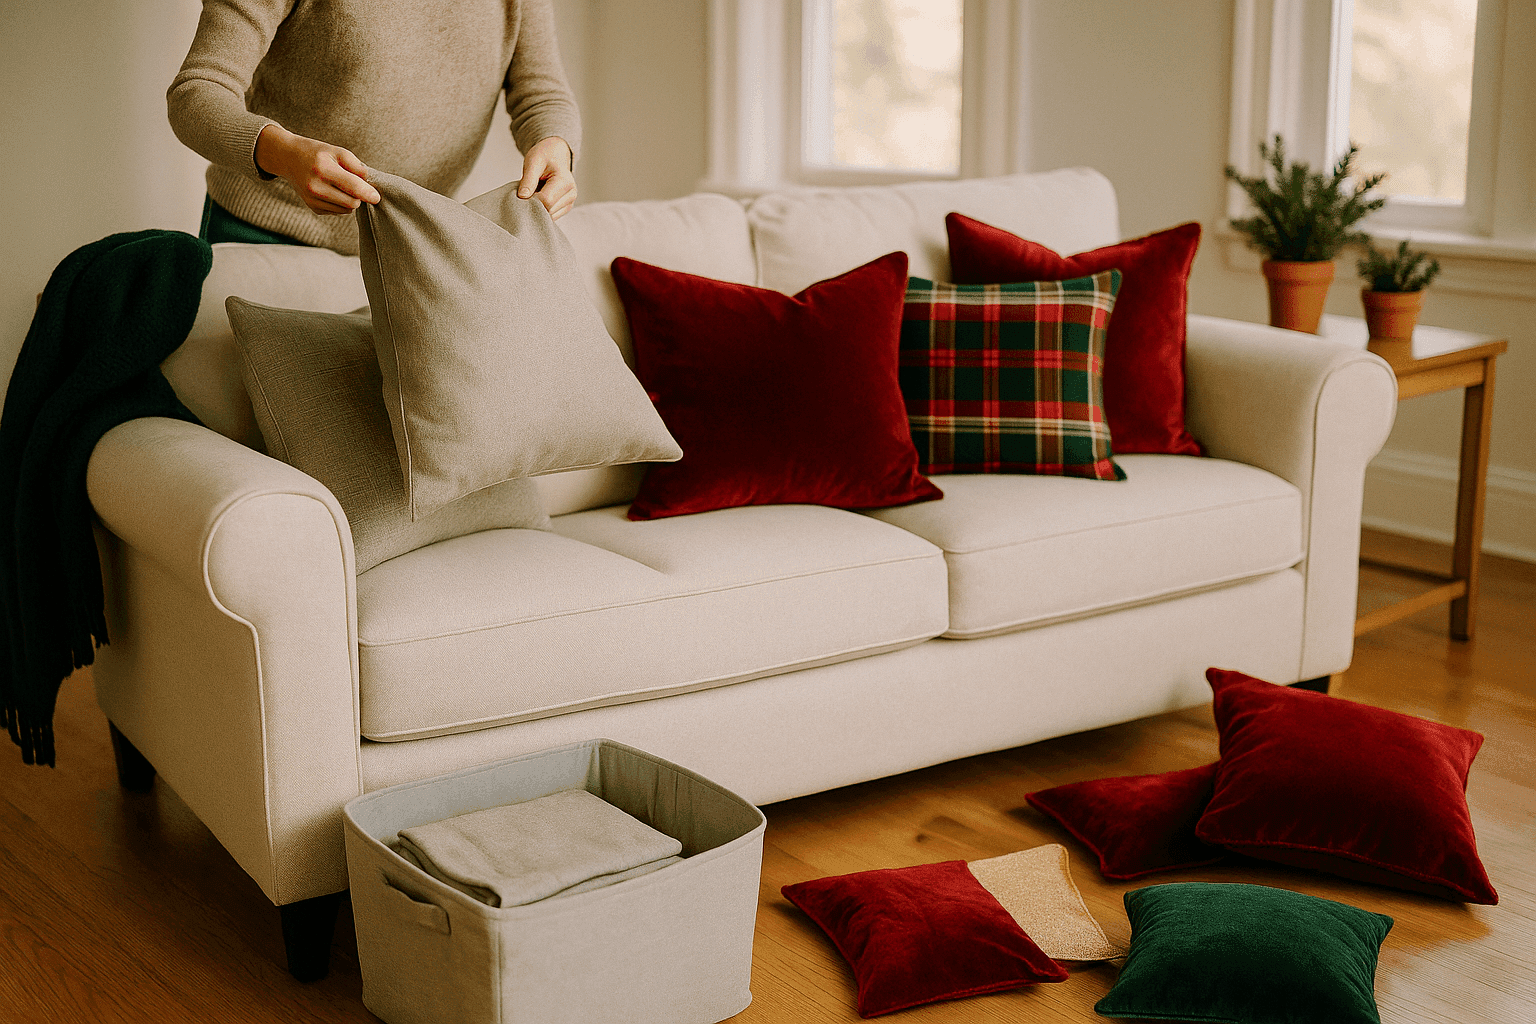
Transformation Steps
- Measure your existing pillow inserts before shopping, noting whether they're 18x18, 20x20, or other sizes—buying covers that match your insert dimensions ensures professional-looking results without saggy corners.
- Remove everyday pillow covers from all inserts on your sofa, chairs, and bed, keeping inserts intact rather than removing stuffing—you're just changing the covers like putting on different outfits.
- Store removed covers immediately in a labeled bin before the room gets messy, folding them neatly so they're ready to rotate back after the holidays without needing washing or ironing first.
- Insert your existing pillow forms into holiday covers, working the insert into corners and ensuring fabric sits smoothly without bunching—for tight-fitting covers, fold the insert in half temporarily to ease installation.
- Zip or tuck envelope backs closed, hiding closures toward the back of furniture where they won't be visible to guests entering the room or sitting on the sofa.
- Arrange pillows on furniture using the professional designer rule: larger pillows in back, smaller toward front, alternating solid colors with patterns for visual interest rather than matching everything exactly.
- Fluff each pillow by karate-chopping the center to create that dimensional pouf that makes pillows look inviting rather than flat and sad, then position them at slight angles rather than standing perfectly upright.
- Mix textures strategically—pair smooth velvet with nubby plaid, shiny metallic with matte linen—creating tactile variety that makes the arrangement feel curated rather than like you bought a matching set.
- Step back and assess from the room's entrance to see what guests will see when they arrive, adjusting placement until the arrangement feels balanced without being too matchy or chaotic.
Professional interior designers create cohesive holiday looks by choosing pillow colors that already exist somewhere else in the room—if you have navy blue curtains, add a navy velvet holiday pillow; if your rug has burgundy accents, echo that in a wine-colored cover. This creates intentional color flow rather than random holiday additions that feel disconnected from your existing decor. The magic number for pillow arrangements is odd numbers—3 or 5 pillows per seating area looks more natural and visually interesting than even numbers, which feel too symmetrical and stiff. For maximum impact with minimum investment, designate one "statement pillow" per room in a bold pattern or luxe fabric like metallic brocade, then surround it with simpler solid covers that let the statement piece shine. When storing everyday covers, fold them with the decorative side facing inward to protect from dust and fading, and include a dryer sheet in the storage bin to keep them fresh-smelling for months. Consider the scale of your furniture when choosing covers—oversized sectionals can handle larger 22-24 inch pillows, while petite loveseats look best with standard 18-inch sizes that don't overwhelm the piece. The styling trick that makes the biggest difference? Don't line pillows up like soldiers—overlap them slightly, angle them at 45 degrees, and let some lean while others stand, creating that "casually elegant" look that suggests you just naturally have great taste rather than spending 20 minutes arranging things perfectly. Remember that this 10-minute transformation extends beyond living rooms—swap bedroom pillow shams, dining chair cushion covers, and even outdoor furniture pillows if your porch is covered, creating a cohesive holiday aesthetic that flows throughout your entire home with minimal effort and maximum impact.