Interior Design

Recent Content

Dig In: Build a Potting Table With Built-In Storage

Dig In: Build a Potting Table With Built-In Storage

Stop potting on your knees. Build a waist-height potting table with lower storage in one afternoon for $50–$80 and transform your spring planting.

Saw, Screw, Plant: Build a Cedar Planter Box

Saw, Screw, Plant: Build a Cedar Planter Box

Cedar boards + 90 minutes + $20 = a classic planter box built to last for years. Build several and finally give your garden the display it deserves.

Harvest & Hang: Build Your Own Herb Drying Racks

Harvest & Hang: Build Your Own Herb Drying Racks

Mesh screen + wood frame + one hour = years of homegrown dried herbs at peak flavor. Build your own drying racks and never waste a harvest again.

A Stanford White Gilded Age Mansion Just Cut to $3.7 Million

A Stanford White Gilded Age Mansion Just Cut to $3.7 Million

The Williams-Butler Mansion — 40 rooms, 29,000 sq ft, designed by Stanford White — just dropped to $3.7M on Buffalo's Millionaires' Row.

Spoon Fed: Make Charming Garden Markers for $5

Spoon Fed: Make Charming Garden Markers for $5

Dollar store spoons + a paint pen = charming garden markers for 25 cents each. Make your entire vegetable garden for under $5 this Tuesday.

Glow Up: Transform Basic Mirrors Into Statement Pieces

Add drama with neon lighting that makes every mirror moment feel like a photo shoot

Modern frameless mirror with vibrant LED neon rope lights creating glowing frame in stylish bedroom with dramatic lighting effect
INTERIOR DESIGN

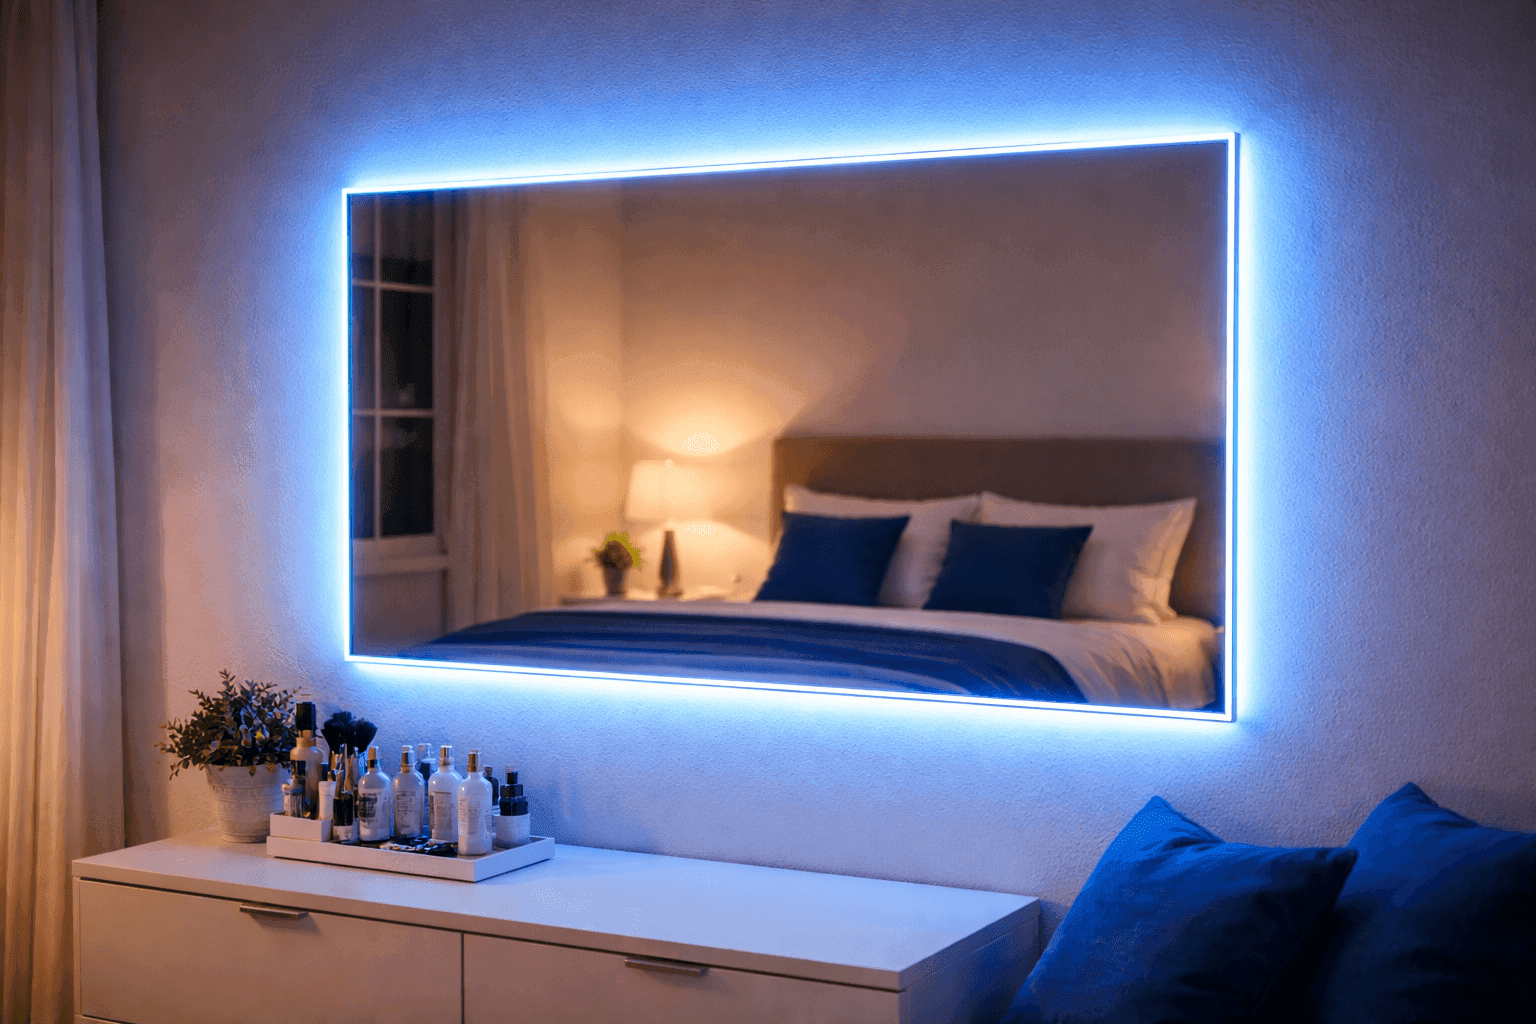
Let's be honest—that plain mirror hanging in your bedroom or bathroom is doing its job but bringing absolutely zero personality to the space. While Instagram-worthy vanity mirrors with built-in lighting cost $200-400, you can create that same glowing, ultra-modern aesthetic for under $25 and thirty minutes of effort. LED neon rope lights have revolutionized DIY décor by making professional-looking accent lighting accessible and affordable, and wrapping them around a mirror's perimeter creates instant drama that transforms the entire room. This isn't just functional lighting—it's a mood, an aesthetic, a statement that says you care about your space looking good. The continuous glow flatters every angle during makeup application or outfit checks, while the bold color options let you match your room's vibe or change it up entirely with color-changing RGB strips. Whether you're going for hot pink glamour, electric blue edge, or lime green energy, this simple upgrade takes your mirror from basic necessity to glowing centerpiece that makes every selfie and mirror moment feel like you're getting ready for something important.

What You'll Need

  • Mirror Foundation:
    • Frameless mirror or remove existing frame
    • Any size works—measure perimeter first
    • Wall-mounted or freestanding style
  • LED Lighting ($15-25):
    • Flexible LED neon rope lights matching perimeter length
    • Bold color options: hot pink, electric blue, lime green
    • RGB color-changing strips for maximum versatility
    • Battery pack for portability or plug-in adapter
  • Installation Supplies:
    • Clear adhesive clips designed for LED strips
    • Strong double-sided tape rated for LED weight
    • Rubbing alcohol for cleaning mirror edges
    • Scissors for trimming excess lighting

Create Your Glow

  1. Measure your mirror's entire perimeter carefully, adding a few extra inches to ensure you have enough LED rope light to complete the full frame without awkward gaps.
  2. Choose your color vibe based on your room's aesthetic and your personal style—hot pink for bold glamour, electric blue for modern edge, lime green for energetic vibes, or RGB for mood-matching versatility.
  3. Clean the mirror's edges thoroughly with rubbing alcohol and let dry completely, because proper adhesion depends on surfaces being completely free of dust, oils, and residue that prevent sticking.
  4. Plan your power source location before starting installation—figure out where the battery pack will hide or how the plug-in cord will route to the nearest outlet without looking messy.
  5. Attach the LED rope light starting at the bottom center or a corner, using clear adhesive clips or strong double-sided tape every 6-8 inches to keep the lighting as close to the mirror edge as possible for maximum glow effect.
  6. Work slowly around the entire perimeter, pressing firmly at each attachment point and ensuring the rope light follows the mirror's edge smoothly without bunching or creating uneven spacing.
  7. Connect to your power source once the full perimeter is secured, testing the lights before finalizing placement to confirm everything illuminates evenly and creates the dramatic glow you're going for.
  8. Conceal any visible wiring or battery packs behind the mirror, along the wall, or inside decorative elements nearby—the magic is all about that seamless glowing frame, not visible power sources.
DESIGNER TIP

Interior designers love this trend because it adds architectural interest and ambient lighting simultaneously—the mirror becomes both functional surface and sculptural light source. For next-level impact, install a dimmer switch or choose RGB strips with remote controls that let you adjust brightness and color to match your mood, time of day, or specific activities. Position the mirror where the glow reflects off other surfaces to multiply the effect—opposite a window for daytime drama or near lighter walls that amplify the neon vibe. If you're feeling extra, layer this with other LED accent lighting in the room for a cohesive glowing aesthetic that feels professionally designed. The key to making this look expensive rather than DIY is keeping the rope light installation as neat and close to the mirror edge as possible—sloppy gaps or sagging sections kill the sleek effect you're going for.

Related Content

Interior Design

22 March 2026

Post

20-Minute Win: Declutter One Kitchen Cabinet

Pick your most chaotic kitchen cabinet, set a 20-minute timer, and fix it for good. One small win that makes cooking less stressful every single day. ...

Interior Design

16 March 2026

Post

Build a Boutique Jewelry Organizer for $30

Trade your tangled jewelry drawer for a boutique wall display. A painted pegboard with hooks takes 2 hours and $30 to build. 💎...

Interior Design

09 March 2026

Post

Thrift Store Vases Into Designer Decor for $12

Mismatched thrift store vases become a designer collection for $12. One color palette, a few texture tricks, and done in an afternoon....

Interior Design

07 March 2026

Post

Boho Macramé Plant Hangers for $10 Each

Why pay $45 at a boutique? Knot your own boho macramé plant hangers in 1–2 hours for $10 each — two basic knots is literally all it takes....

Interior Design

05 March 2026

Post

Dresser Drawer Turned Floating Shelf for Under $10

Why buy a shelf when a thrift store drawer makes a better one for under $10? Sand, paint, mount, and style — done in an afternoon....

Interior Design

04 March 2026

Post

Color Confidence: How to Choose Paint That Actually Works

Stop guessing at the paint store — here's how designers actually choose colors...

Interior Design

04 March 2026

Post

Let There Be (Better) Light: A Room-by-Room Lighting Guide

The most overlooked design element — and the one with the most impact...

Interior Design

04 March 2026

Post

Move the Sofa: Furniture Arrangement Rules Worth Breaking

Why your room doesn't feel right — and how to fix it without buying anything...

Interior Design

04 March 2026

Post

Gallery Wall Done Right: From Blank Wall to Curated Display

From Blank Wall to Curated Display...

Interior Design

04 March 2026

Post

Frame the View: Window Treatments That Make the Room

he finishing touch most rooms are missing — and it's easier than you think....

Interior Design

04 March 2026

Post

Room Refresh Playbook: Transform Any Space on Any Budget

Transform Any Space on Any Budget...

Interior Design

28 February 2026

Post

Go Bold: Checkerboard Floor That Makes Your Laundry Room Fun

Black + white floor paint + tape = graphic checkerboard that transforms boring laundry rooms. Go bold in utility spaces for $50-80 this weekend!...

Interior Design

21 February 2026

Post

Glitter Grout Magic: Add Unexpected Glamour to Your Bathroom Tiles

Transform bathroom tiles with glitter grout! Mix fine sparkle into grout lines for subtle glamour. Works with new or existing grout. $10-15, 1-2 hours. Magical!...

Interior Design

17 February 2026

Post

Eclectic Display: Create Gallery Walls With Thrifted Charm

Create eclectic gallery walls for $40-60 with thrifted mismatched frames! Mix sizes, styles, finishes for personality. Beats $300 matching sets....

Interior Design

07 February 2026

Post

Fridge Glow-Up: Bold Vinyl Transforms Boring Appliances

Transform white fridges into bold statements with $30 removable vinyl! Geometric color-blocking looks custom. Totally renter-friendly....
Terms and ConditionsDo Not Sell or Share My Personal InformationPrivacy PolicyPrivacy NoticeAccessibility NoticeUnsubscribe
Copyright © 2026 DIY HomeBoost