Go Bold: Checkerboard Floor That Makes Your Laundry Room Fun
Turn the most boring room in your house into a graphic design statement
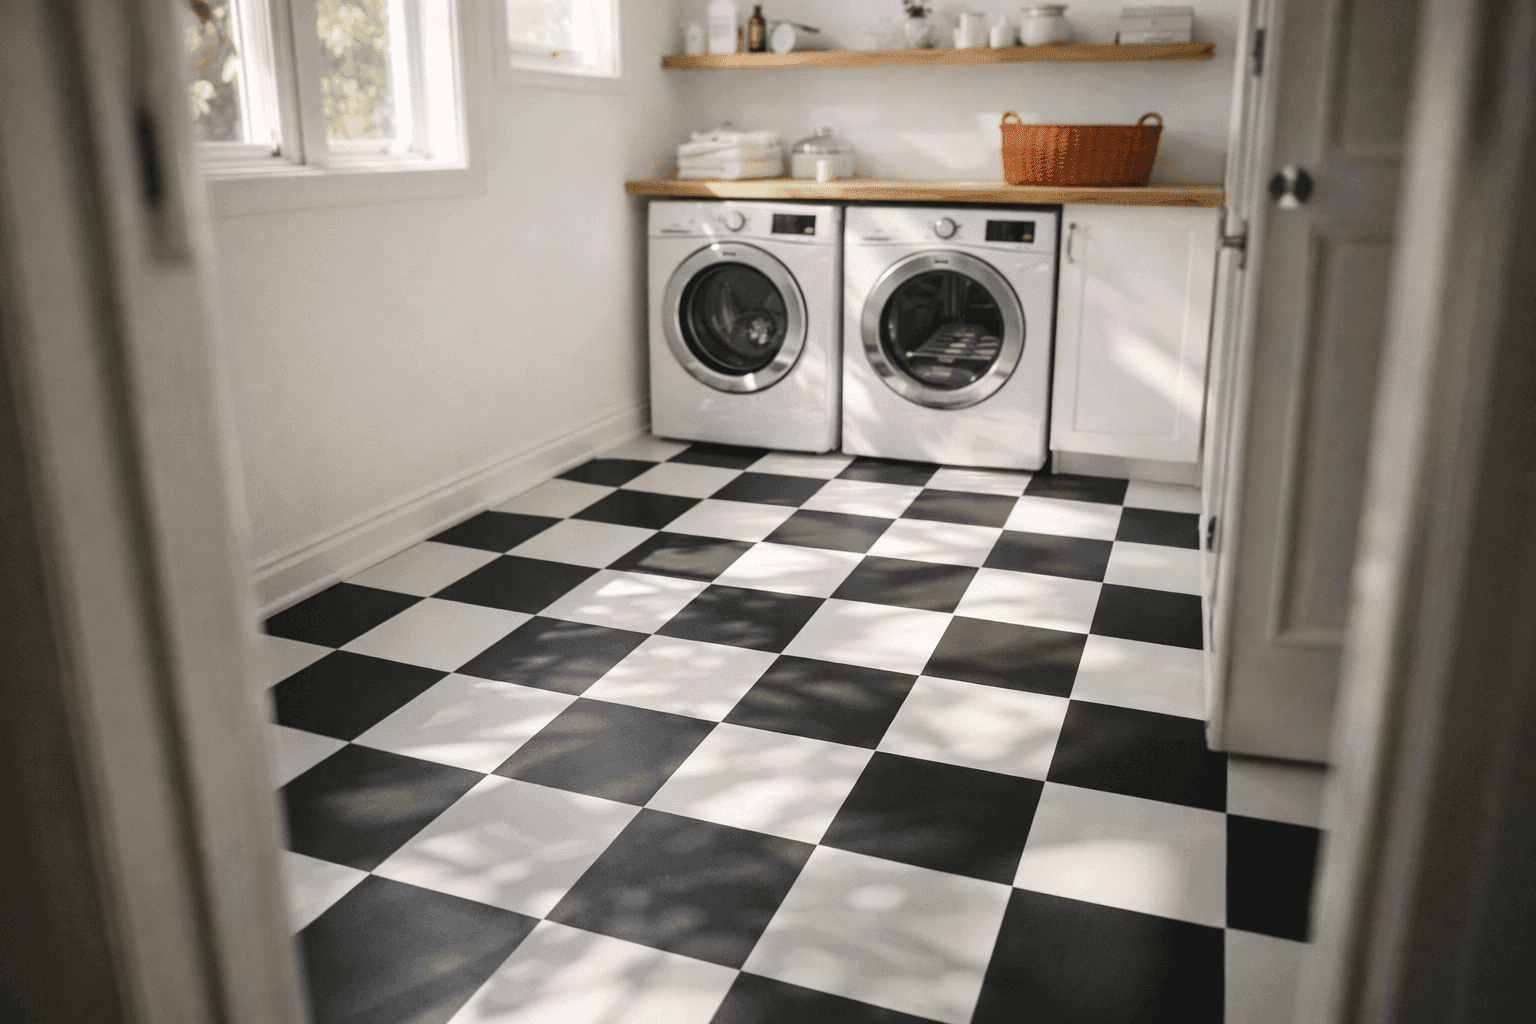
Your laundry room is probably the one space in your house where nobody expects anything interesting, which makes it the perfect place to go absolutely wild with a bold design choice that would feel risky anywhere else. A classic black and white checkerboard floor transforms that forgettable utility room into a space with serious personality—suddenly doing laundry feels less like a chore and more like spending time in a retro diner or vintage boutique. I painted mine after years of staring at boring beige linoleum, and honestly, I never expected a floor pattern to make such a dramatic difference in how I felt about the most mundane household task. The graphic contrast is fearless and fun, the pattern is surprisingly forgiving of imperfections because your eye focuses on the overall effect rather than individual squares, and the whole project costs $50-80 for a typical laundry room. Think of it as giving yourself permission to be playful in a space that's usually purely functional—because why shouldn't utility spaces spark joy too?
What You'll Need
- Floor paint: One quart each of black and white porch and floor paint, oil-based or latex ($20-30 per quart)
- Primer: One quart if your floor needs it—concrete and bare wood definitely do ($15-20)
- Clear polyurethane sealer: Water-based or oil-based for durability in high-traffic area ($25-35 per quart)
- Painter's tape: High-quality 2-inch tape for crisp lines ($8-12 for a multi-pack)
- Measuring tape and pencil: For mapping out your grid
- Chalk line or long straightedge: For marking grid lines across the room
- Paint rollers and tray: Small 4-6 inch rollers work best for individual squares
- Angled brush: For cutting in edges and corners
- Floor cleaner and degreaser: For prepping surface
- Drop cloths: To protect baseboards and lower cabinets
Step-by-Step Instructions
- Prep the floor thoroughly by cleaning with degreaser, filling any cracks or holes, sanding rough spots, and applying primer if needed—proper prep makes the difference between a floor that lasts years versus one that chips in months
- Calculate your square size by measuring room dimensions and dividing by even numbers to create squares between 10-18 inches—larger squares read better from standing height and require less taping
- Mark your grid using chalk lines or straightedge to draw perpendicular lines creating a perfect checkerboard layout, starting from the most visible corner and working outward so any partial squares end up in less noticeable areas
- Paint the base color by applying two coats of white floor paint to the entire room, letting each coat dry completely—this creates your white squares and a uniform base for black squares
- Tape off alternating squares carefully following your grid lines, pressing tape edges firmly to prevent bleed-through—this is tedious but critical for crisp, professional-looking results
- Paint black squares by applying two thin coats of black floor paint within the taped areas, using a small roller for efficiency and angled brush for edges—remove tape while the final coat is still slightly tacky for cleanest lines
- Let cure completely for 48-72 hours before walking on the floor, even though paint may feel dry to touch—full curing prevents marring and ensures paint has properly bonded
- Seal with polyurethane by applying 2-3 thin coats of clear sealer following manufacturer's dry times between coats—this protects your bold pattern from scuffs, water damage, and general wear from laundry baskets and foot traffic
Interior designers know that checkerboard floors work magic in small spaces because the geometric pattern creates visual interest that makes rooms feel larger and more intentional rather than just utilitarian. The classic black and white combination is timeless, but don't be afraid to substitute navy blue, deep gray, or even sage green for the dark squares if that better suits your home's palette—the graphic contrast is what creates impact, not specifically black. For extra personality, orient your checkerboard on a 45-degree diagonal instead of straight—it's more complex to layout but creates stunning visual movement and makes rectangular rooms feel more dynamic. Consider extending the pattern slightly under your washer and dryer so it peeks out in front, creating a cohesive look rather than stopping at an awkward line. The most common mistake is choosing squares that are too small—anything under 10 inches reads as busy rather than bold, and tiny squares exponentially increase your taping time. For households with messy laundry situations, consider glossier paint finishes that wipe clean more easily than flat or matte, though high-gloss can show imperfections in the floor surface more readily. Add matching black and white accessories—storage baskets, soap dispensers, or artwork—to play up the graphic theme and make your utility room feel like an intentionally designed space rather than an afterthought.